Pre-requisite: Cloud Concept follows Client-Server Model
Many client nodes (devices used by application users) use services from a centralized servers. Client sends/makes requests (ie: requesting to fetch a webpage) and the server performs these tasks and returns the information. Essentially servers and clients are both computers but servers have high capability to perform tasks because they are built with about 70 CPUs or more.
Many client nodes (devices used by application users) use services from a centralized servers. Client sends/makes requests (ie: requesting to fetch a webpage) and the server performs these tasks and returns the information. Essentially servers and clients are both computers but servers have high capability to perform tasks because they are built with about 70 CPUs or more.
Cloud Computing
A computing service made available over the internet (ie: offering server capability through internet). It is a pay-as-you-go model for delivering IT resources where you pay only for what you use.
Benefits
- Cost Saving; Flexibility & Scalability: instant resource of access; Security
Benefits
- Cost Saving; Flexibility & Scalability: instant resource of access; Security
3 Types of Deployment Models
1) Cloud-Based
2) Private-Cloud/On-premise Based
3) Hybrid
- Allows you to build-new/move-existing applications to cloud
- Ex: A company might create virtual servers, databases, and networking components completely in cloud
- All levels of services: management, architecting, and infrastructure will be cloud based
2) Private-Cloud/On-premise Based
- An application that might require specific technology to run-on
- These tailored-technologies and data centre are kept on-premise
- Follows an IT infrastructure model which makes it more effective
3) Hybrid
- Connecting cloud resources to an on-premise infrastructure
- Suitable when working with sensitive data or under government regulations
EC2 = Elastic Cloud Compute
'Elastic' means scaling (increasing capacity) up and down is easy. EC2 is part of the compute service of AWS, other services offered are: Machine Learning, Data Storage, and etc.
A virtual computing environment (server) is called an EC2 instance. An on-demand EC2 instance is an offering from AWS where the subscriber/user can rent the virtual server per hour and use it to deploy their own applications.
A virtual computing environment (server) is called an EC2 instance. An on-demand EC2 instance is an offering from AWS where the subscriber/user can rent the virtual server per hour and use it to deploy their own applications.
- Pre-configured templates of these instances are called AMIs (Amazon Machine Images)
- * AMIs package the bits you need for creating a server (such as operating system or additional software dependencies).
- * A disk image is a snapshot of a storage device's structure and data typically stored in one or more computer files on another storage device. Creating a disk image of a hard disk drive is typically done to make the content available to one or more virtual machines. VMs emulate a CD/DVD drive by reading an ISO image (.ISO disk image file) which is faster than reading from the physical optical medium.
- Instance types consists of different configurations of CPU, memory, storage, and network capacity
- * Launch - basic configuration & select instance type > Connect instance to application > Execute commands to use instance
- -
- Storage volumes for temporary data. When you stop or terminate an instance, the data is also deleted. It is also known as instance store volumes.
- Persistent storage volumes for your data using Amazon Elastic Block Storage (or Amazon EBS).
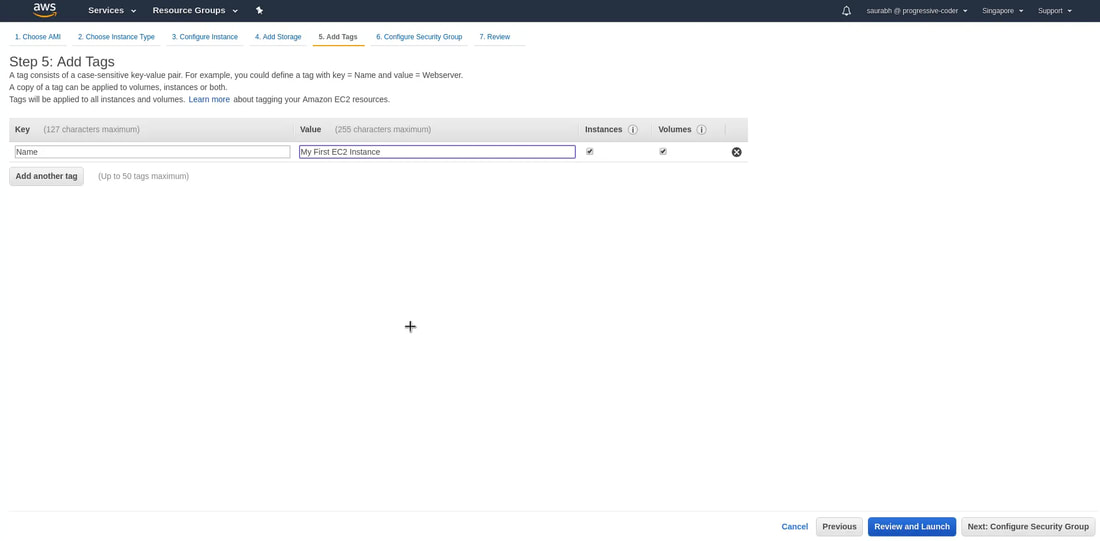
- Tags are used to better identify your AWS EC2 resources.
Guide: Launching an ec2 instance
Launch an EC2 instance
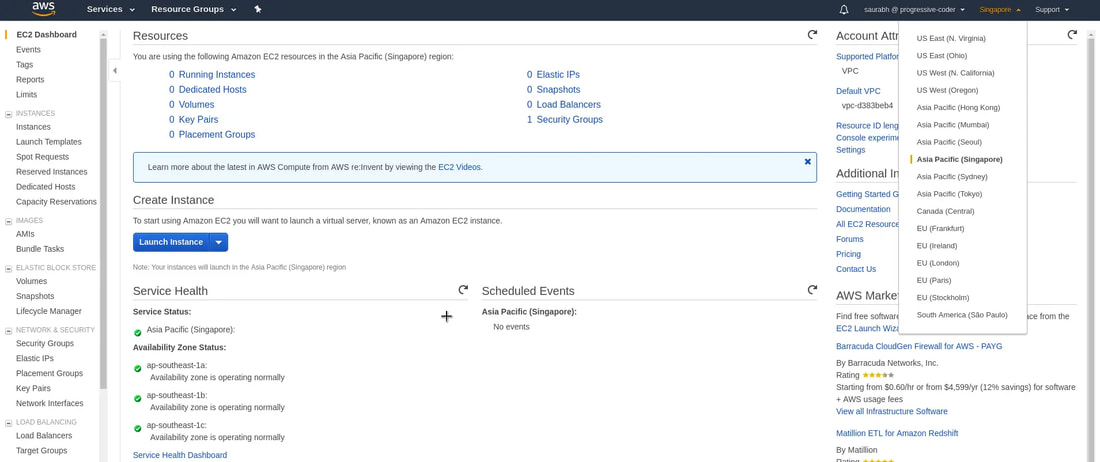
1. Create and login to your AWS account. In your AWS Management Console, search and click on 'EC2' - Virtual Servers (could be under compute section). This will lead to the EC2 dashboard.

2. Currently, it shows 0 running instance. But we now need to select the Region in which we want to host our AWS EC2 instance. After selecting the region, click on the 'Launch' button.
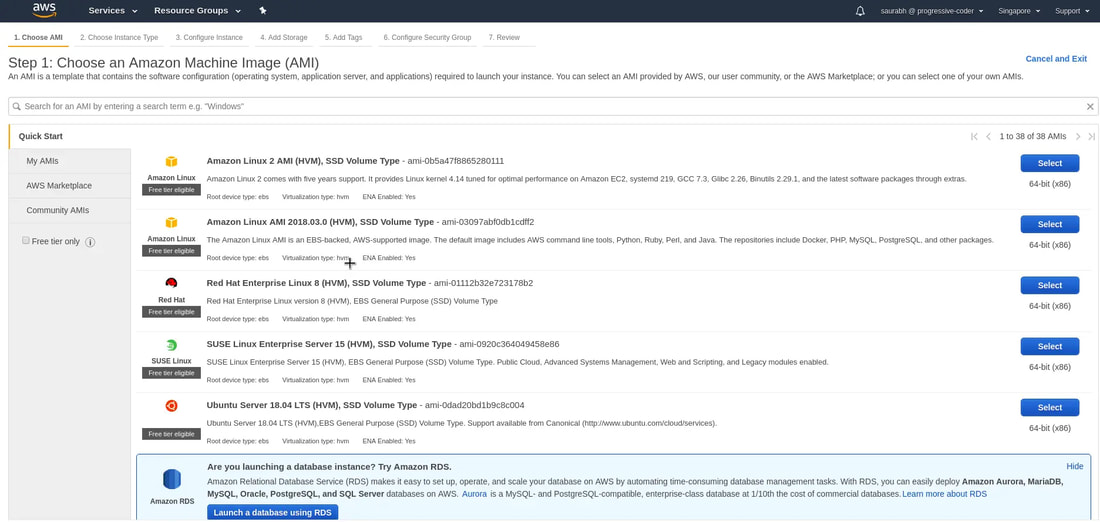
3. Choose an AMI (Amazon Machine Image) - basically it is the type of server (w/ an OS template) that we want for our application. For this demo, we're choosing Amazon Linux 2 AMI (and most important for AWS Certified Solutions Architect certification and free-tier eligible).
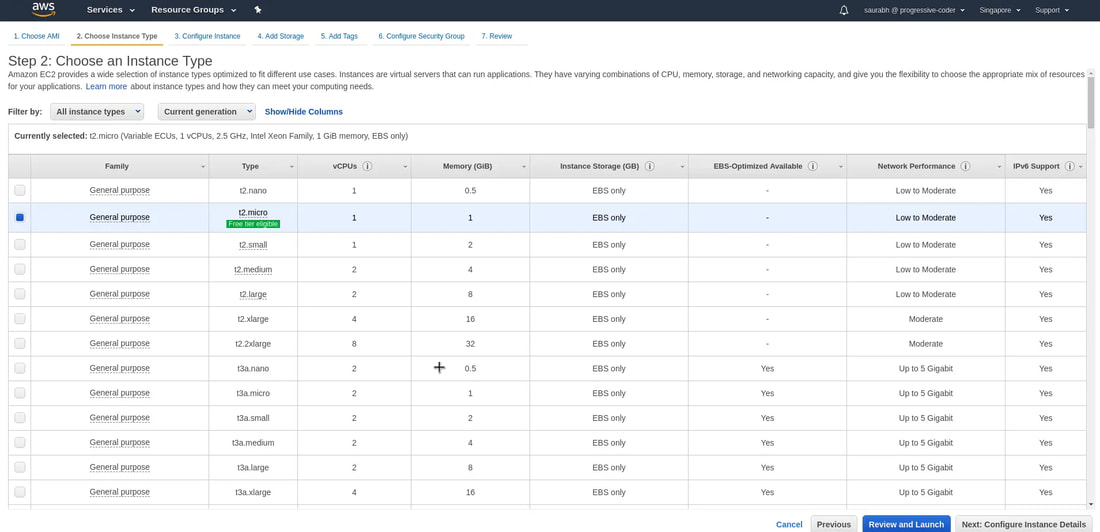
4. Select an instance type. For this demo, we'll choose t2.micro since it is free-tier eligible. And then click on 'Next: Configure Instance Details' to look at other options in the workflow.
5. Configure instance options. (ie: we can select the # of instances, purchasing options, Network, Subnet, and pubic IP). Click 'Next: Add Storage'.

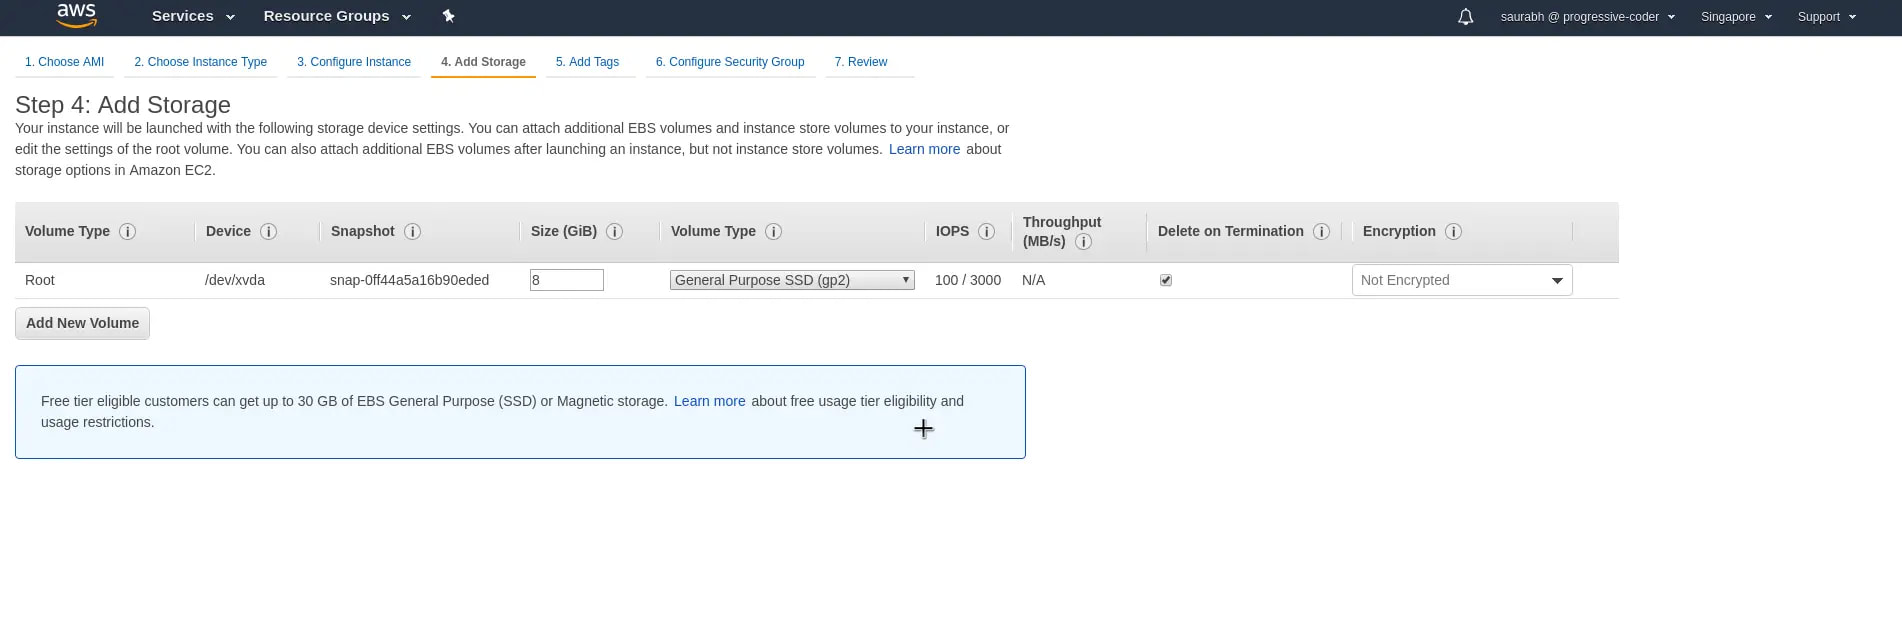
6. We have the option to add addition storage to our AWS EC2 instance. Below pic show default storage volume.
* Delete on Termination is checked = when the EC2 instances is terminated, the storage will be wiped.
* Delete on Termination is checked = when the EC2 instances is terminated, the storage will be wiped.
7. Add a tag to identify your instance. And click on 'Next: Configure Security Group'. The instances should be tagged (name given under Value) based on their department, environment like Dev/SIT/Prod - (ie: SIT-MyCloudApp).
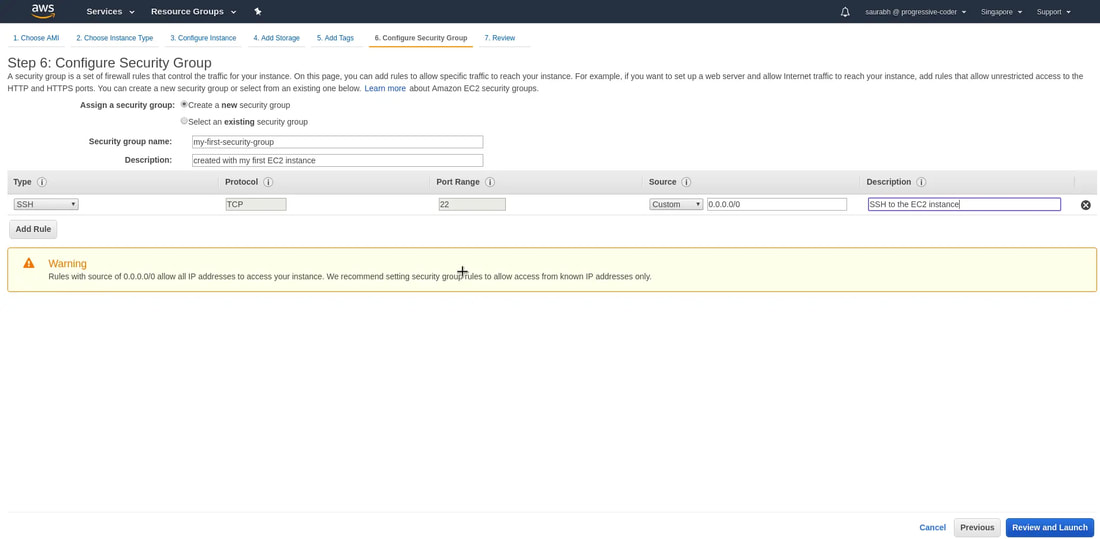
8. Configure Security Group. Basically, a security group is a set of firewall rules that control the traffic for your instance. By default, only one rule is enabled. This is to SSH into the AWS EC2 instance through port 22. And we will see how that is done soon.Give an appropriate Security Group Name and some description to identify the security group. Click on Review and Launch button.
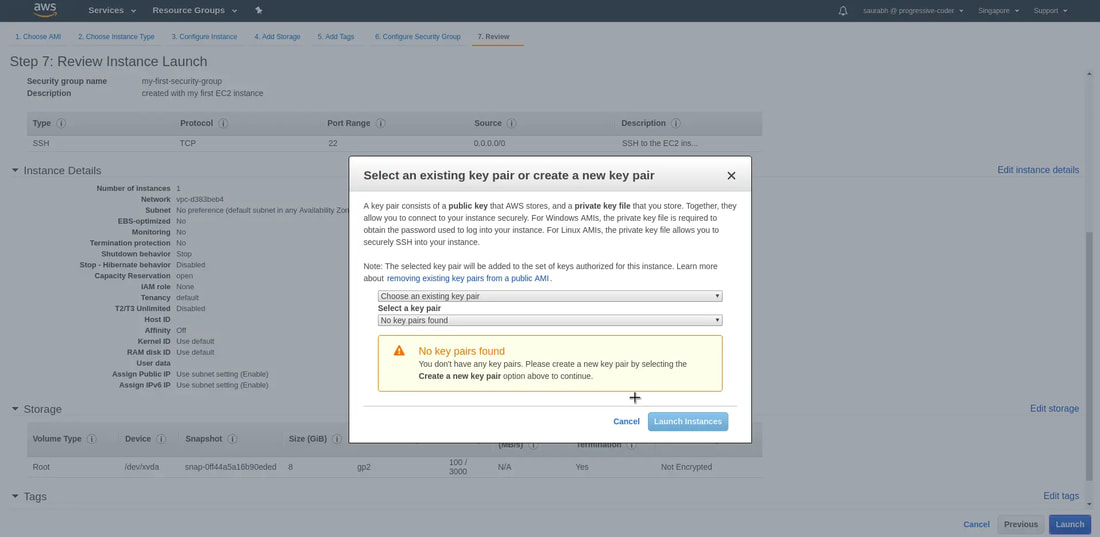
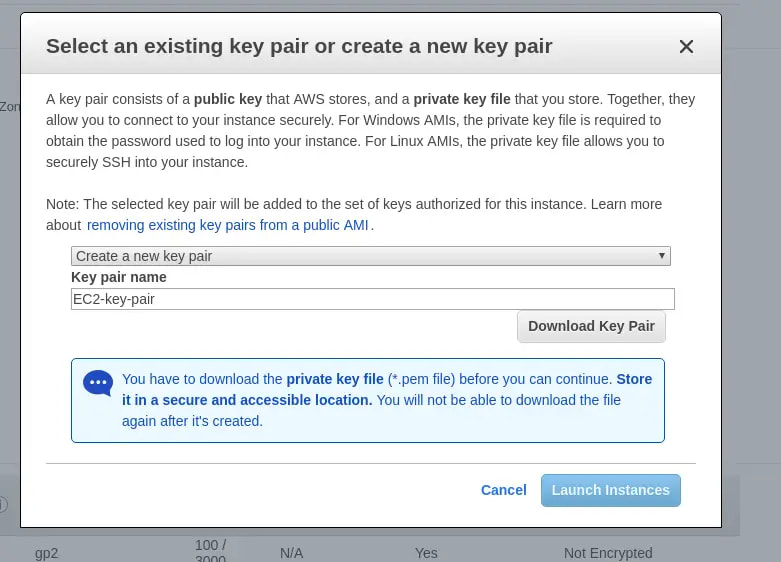
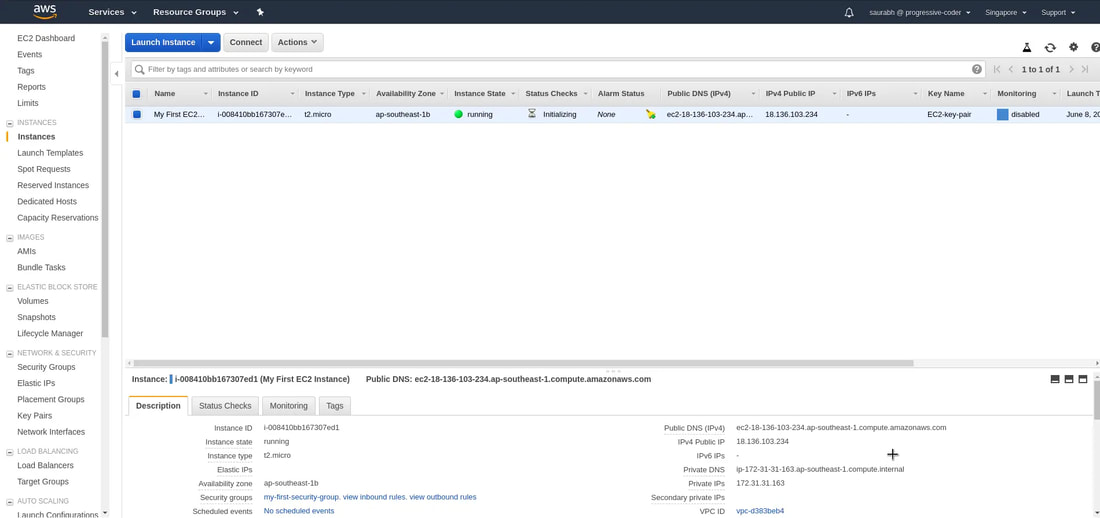
9. Review all the details and click on 'Launch'. Next, you'll have to select create a new key pair option and give it a name. At this point, you HAVE to download the private key file or the .pem file to a secure location on your computer (else the private key file will be lost forever and cannot be downloaded again). Finally, click on 'Launch Instances'. And when we click on 'View Instances', we'll see that our instance is running.
|
|

|
|
10a. Accessing AWS EC2 Instance using SSH. First, we need the public IP (IPv4 Public IP) of our instance

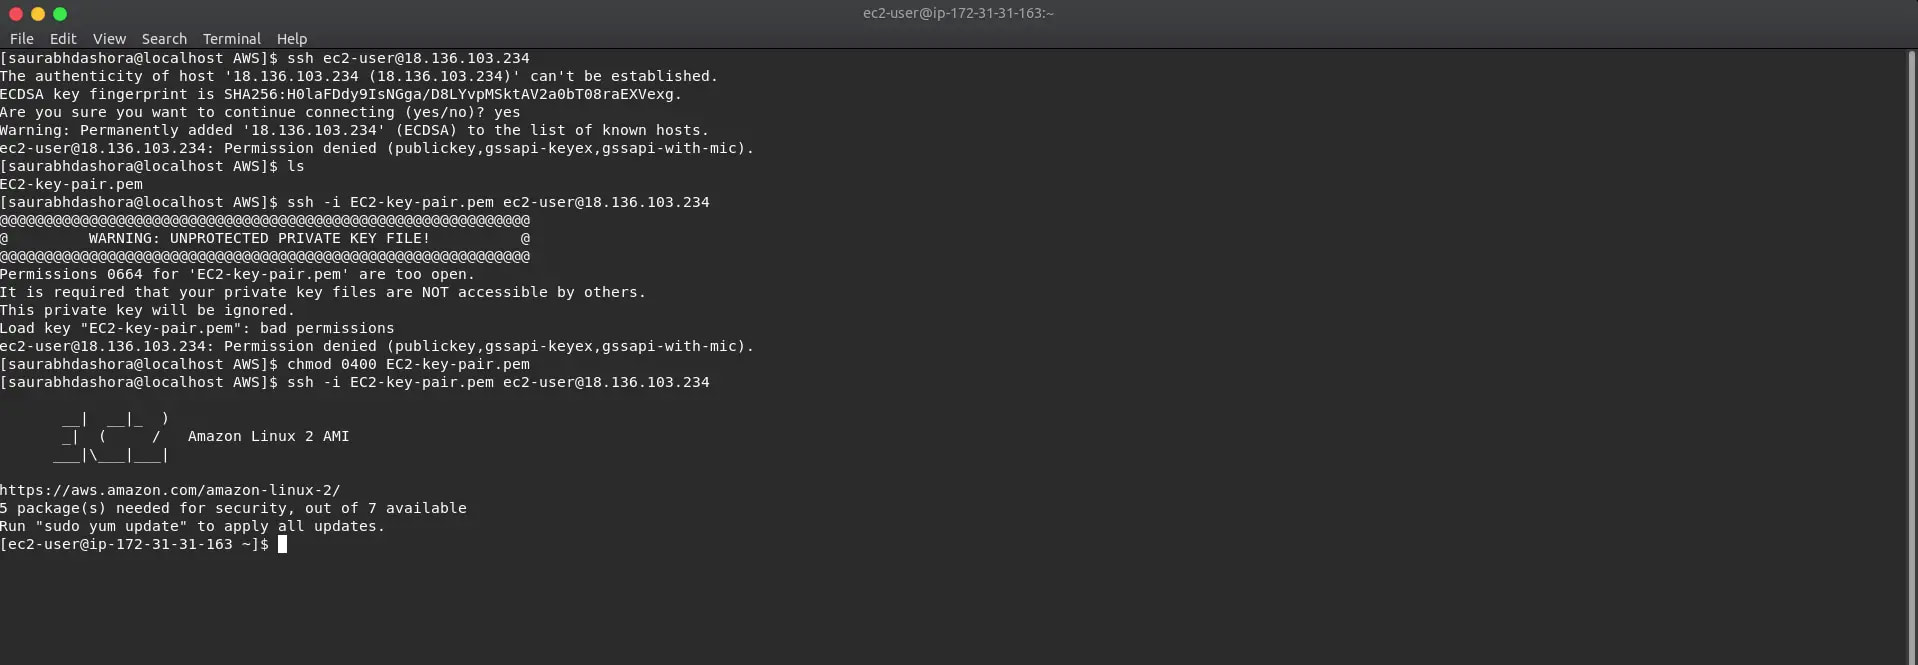
10b. We will first chmod to secure the private key and execute this command from the folder where we placed the private key. > chmod 0400 EC2-key-pair.pem
> ssh -i EC2-key-pair.pem ec2-user@<IP-address>
> ssh -i EC2-key-pair.pem ec2-user@<IP-address>
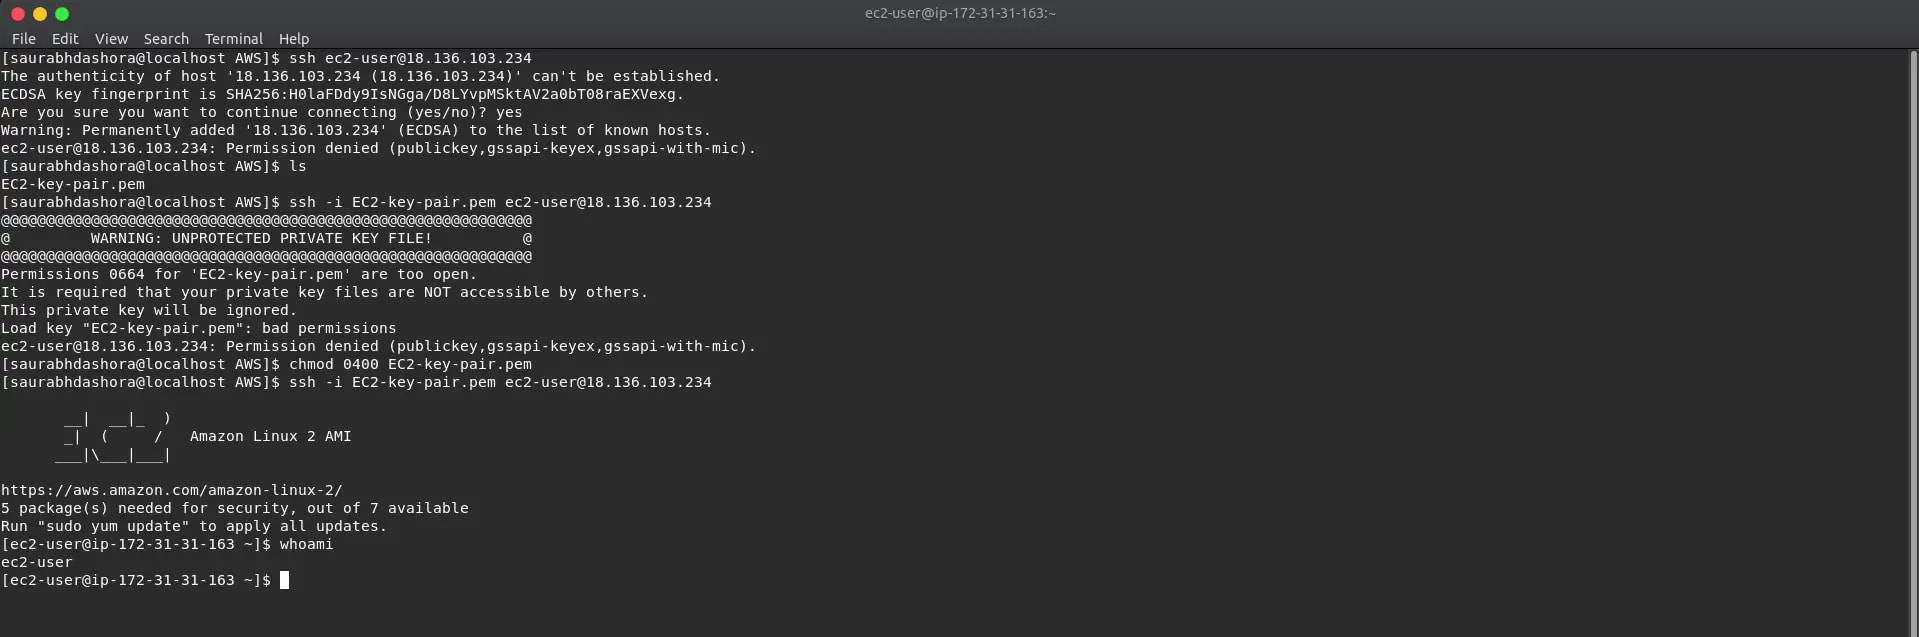
Now we are logged into the instance, type 'exit' to quit server.
Instance Types
General Purpose - Balance between computing, memory, and networking resources
Ex Uses: Application servers, Gaming servers, Backend servers for companies, Small&Medium databases
Ex Server names: M7g, Mac, M6g, M6i, M6in, M6a, M5, M5n, M5zn, M5a, M4, A1, T4g, T3, T3a, T2
Compute Optimized - Ideal for compute bound applications and high-performance processors
Ex Uses: Ad server engines, Machine Learning Engines, Scientific Modelling, Dedicated Gaming Servers
Ex Server names: C7g, C7gn, C6i, C6in, C6a, C6g, C6gn, C5, C5n, C5a, C4
Memory Optimized - When large datasets need to be loaded before running the app = fast performance with large data sets
Ex Uses: Memory-intensive workloads (ie: open-source databases), in-memory caches, and real-time big data analytics
Ex Server names: R7g, R7iz, R6g, R6i, R6in, R6a, R5, R5n, R5b, R5a, R4, X2gd, X2idn, X2iedn, X2iezn, X1, X1e, High Memory, z1d
Accelerated Computing - Utilizes hardware components or co-processors to perform functions
Ex: Uses: Graphic applications, Streaming, Floating point number calculations, Data pattern matching
Ex Server names: P4, P3, P2, Inf2, Inf1, DL1, G5, G5g, G4dn, G4ad, G3, F1, VT1
Storage Optimized - Ideal when there's large data sets on local storage and needs to deliver high amounts of I/O ops per sec.
Ex Uses: require high, sequential read and write access to very large data sets on local storage (like in a database)
Ex Server names: Im4gen, Is4gen, I4i, I3, I3en, D2, D3, D3en, H1
Pricing Option
Spot Instance - This pricing model is best for workloads with flexible start and end times, which can take interruptions.
Auto Scaling
Spot Instance - This pricing model is best for workloads with flexible start and end times, which can take interruptions.
Auto Scaling
- EC2 Auto Scaling can automatically add new instances to the application when necessary and terminate them when no longer needed. It also makes sure that your applications are operating at your desired performance levels.
- You can set a minimum capacity of instances that will always be running. The rest will operate when necessary. A maximum capacity can also be set to cap cost.
- Other than EC2 instances, scaling can also be done for Amazon ECS tasks, Amazon DynamoDB tables & indexes and, Amazon Aurora Replicas.
Guide: auto Scaling
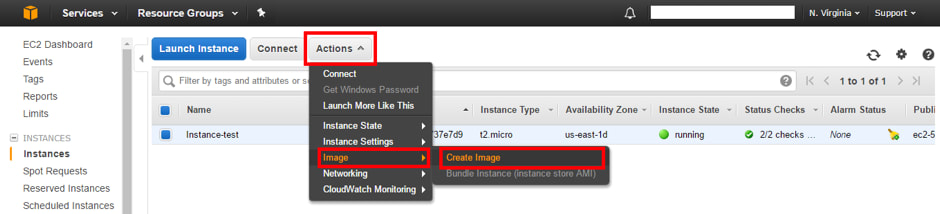
1. First we must create an image of the instance AMI - Select 'Instances'

2. Select a running instance
3. Click on “Actions”> “Image”> “Create Image”.
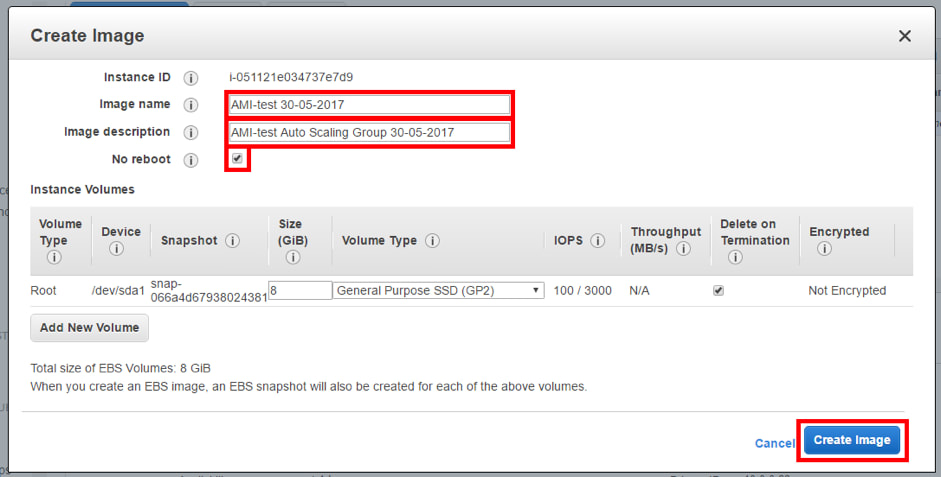
4. Assign a name to the AMI, description and activate the option “No reboot” (to prevent the instance from restarting when creating the AMI).
5. Verify that the AMI has been created successfully, select “AMIs” from the side menu.

6. Check that the “Status” is “available”.

7. Next step is to create the Auto Scaling Group; click on “Launch Configurations” under 'AUTO SCALING' from the side menu. Click on “Create AWS Auto Scaling Group” > Create Launch Configuration
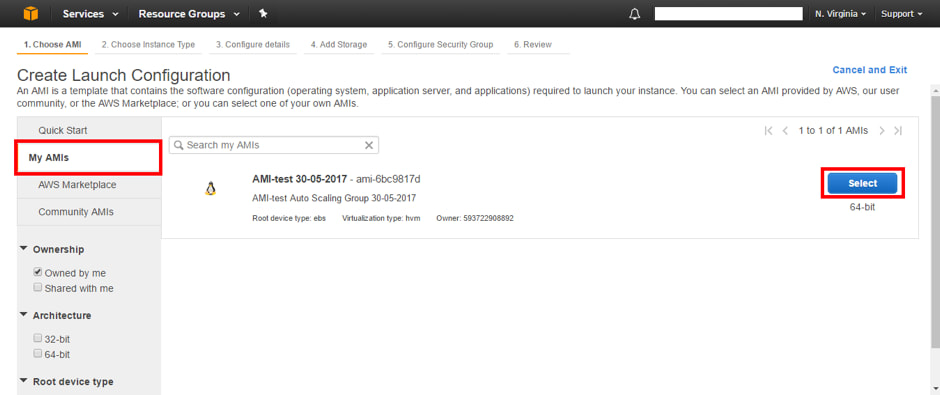
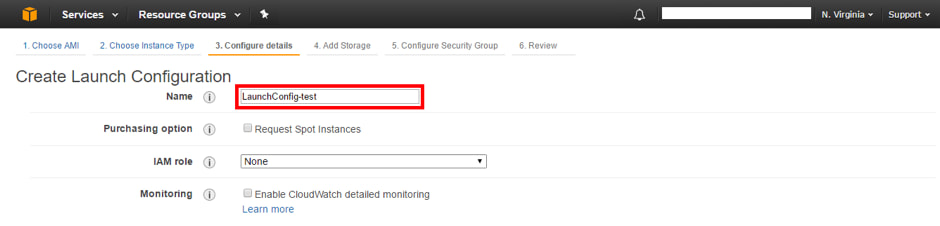
8. Select the type of instance desired for the slave instances (slaves) created by the Auto Scaling Group and press “Next: Configure details”. Then, assign a name to the launch configuration (Launch configuration).
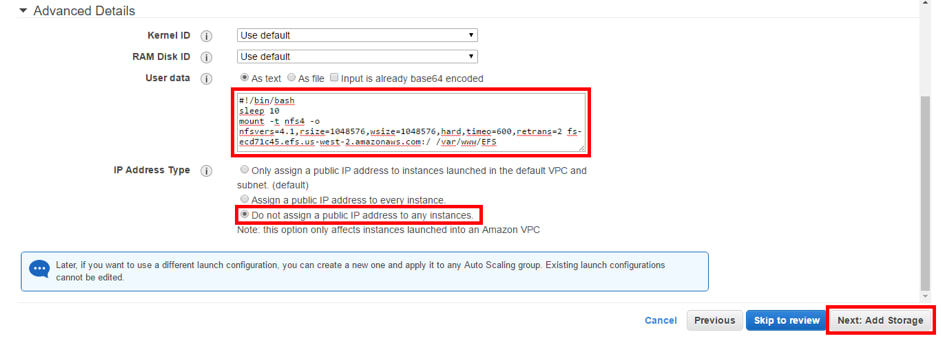
9. In advanced details, in the “User data” section write the commands to mount the EFS and select the option where no public IP is assigned to any instance. Finally press “Next: Add Storage”.
10. The volume (disk size) that will be assigned to the instances created by the Auto Scaling group will have a copy of the volume of the master instance. Press “Next: Configure Security group”. Select the option “Select an existing security group” to assign the same Security Group of the master instance. Check that the settings are correct and create the launch configuration by pressing “Create launch configuration”. Choose an existing key and accept that you have access to it; click on 'create the launch configuration'.
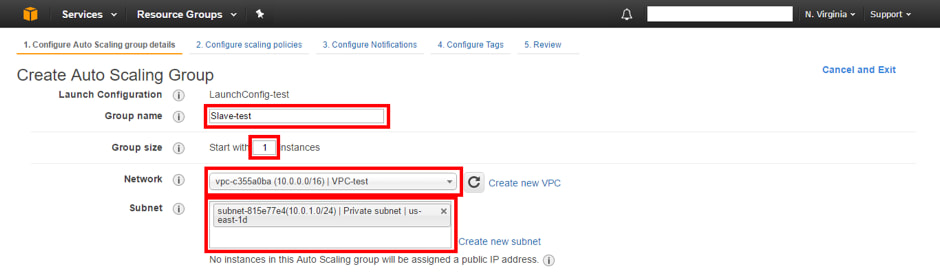
11. The next thing is to configure the Auto Scaling group; Name the group of instances, determine the number of instances with which it will start, select the VPC and the private subnet, you must also specify that the traffic will come from a Load Balancer so that the “slave” instances are automatically added to it. Press “Next: Configure scaling policies.”
12. Adjust group (scaling) policies. Determine the maximum number of possible instances in the group. Add a new alarm for the increase of instances (if you want). Click on "Next: Configure Notifications" > "Next: Configure Tags" - Add Key, Value names. Review the configuration and create the Auto Scaling group. In a few minutes, you can see in “Instances” the instance that is created automatically.

Elastic Load Balancing
It automatically distributes your incoming traffic across multiple targets, such as EC2 instances, containers, and IP addresses, in one or more Availability Zones. It monitors the health of its registered targets, and routes traffic only to the healthy targets.
It automatically distributes your incoming traffic across multiple targets, such as EC2 instances, containers, and IP addresses, in one or more Availability Zones. It monitors the health of its registered targets, and routes traffic only to the healthy targets.
Guide: ELB setup
How to setup ELB (Classic Load Balancer)
Pre-req - ensure the security group of the EC2 instances allow HTTP access
Step 1.
On the Amazon EC2 console page, in the navigation bar choose the region (same as the EC2 instance) for the Load Balancer.
At the side menu, under 'LOAD BALANCING', click on 'Load Balancers' > 'Create Load Balancer' > Create (for classic load balancer)
Step 2.
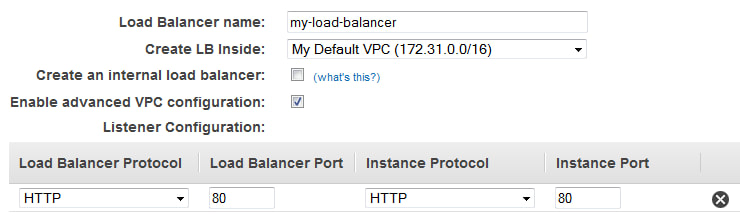
Provide a basic configuration of load balancer (ie: name, network, listener)
For 'Create LB inside', select the same network as the EC2 instances (VPC)
Click on 'Next: Assign Security Groups'
Pre-req - ensure the security group of the EC2 instances allow HTTP access
Step 1.
On the Amazon EC2 console page, in the navigation bar choose the region (same as the EC2 instance) for the Load Balancer.
At the side menu, under 'LOAD BALANCING', click on 'Load Balancers' > 'Create Load Balancer' > Create (for classic load balancer)
Step 2.
Provide a basic configuration of load balancer (ie: name, network, listener)
For 'Create LB inside', select the same network as the EC2 instances (VPC)
Click on 'Next: Assign Security Groups'
Step 3.
If network is VPC => load balancer must be assigned a security group that allows inbound traffic to the ports that you specified for your load balancer and the health checks for your load balancer.
On the Assign Security Groups page, select Create a new security group. Type a name and description for your security group. Choose Next: Configure Security Settings. Click on 'Next: Configure Health Check'
Step 4. Configure health checks for your EC2 instances
If Elastic Load Balancing finds an unhealthy instance, it stops sending traffic to the instance and reroutes traffic to healthy instances. In this step, you customize the health checks for your load balancer.
On the Configure Health Check page, Ping Protocol = HTTP and Ping Port = 80.
For Ping Path, replace the default value with a single forward slash ("/"). This tells Elastic Load Balancing to send health check queries to the default home page for your web server, such as index.html. For Advanced Details => leave as it is. Click on 'Next: Add EC2 Instances'.
Step 5. Register EC2 instances with your load balancer
On the Add EC2 Instances page, select the instances to register with your load balancer. Leave cross-zone load balancing and connection draining enabled. Click on 'Next: Add Tags'
Step 6. Add Tags to to your load balancer
Step 7. Create and verify your load balancer
On review page > Click 'Create' > verify load balancer was created > Close > Select new load balancer >
Under status if at least one instance is active you can test your load balancer. Copy the string from DNS name (for example, my-load-balancer-1234567890.us-west-2.elb.amazonaws.com) and paste it into the address field of an internet-connected web browser. If your load balancer is working, you see the default page of your server.
Microservice
Applications are made up of different components: servers, interfaces, databases, and etc.
Monolithic applications = tightly coupled components ; microservice = loosely coupled components.
In monolithic, if one of the components go down, then the whole service can go down. Microservices can help to keep your service available if one component fails.
AWS has two services that can implement the microservice integration:
- AWS Simple Notification Service (AWS SNS)
Setting up AWS SNS
1. Sign up for an AWS account
2. Create an administrative user (IAM user)
3. Create a topic (from side menu bar)
4. Create a subscription to the topic
5. Publish a message to the topic
6. Once done, delete subscription and topic
- AWS Simple Queue Service (AWS SQS)
AWS EC2 provides virtual server instance. To run EC2:
But with AWS Lambda => Serverless Cloud Service.
AWS Lambda is a service which computes the code without any server. The code is executed based on the response of events in AWS services such as adding/removing files in S3 bucket, updating Amazon DynamoDB tables, HTTP request from Amazon API Gateway etc.
- Setup virtual server instances
- Deploy your code
- Operate and maintain servers
But with AWS Lambda => Serverless Cloud Service.
AWS Lambda is a service which computes the code without any server. The code is executed based on the response of events in AWS services such as adding/removing files in S3 bucket, updating Amazon DynamoDB tables, HTTP request from Amazon API Gateway etc.
How AWS Lambda works

Step 1 − Upload AWS lambda code in any of languages AWS lambda supports (ie: NodeJS, Java, Python, C# and Go).
Step 2 − These are few AWS services on which AWS lambda can be triggered.
Step 3 − AWS Lambda which has the upload code and the event details on which the trigger has occurred. For example, event from Amazon S3, Amazon API Gateway, Dynamo dB, Amazon SNS, Amazon Kinesis, CloudFront, Amazon SES, CloudTrail, mobile app etc.
Step 4 − Executes AWS Lambda Code only when triggered by AWS services under the scenarios such as −
Step 5 − Remember that AWS charges only when the AWS lambda code executes, and not otherwise.
Advantages
Disadvantages
Step 2 − These are few AWS services on which AWS lambda can be triggered.
Step 3 − AWS Lambda which has the upload code and the event details on which the trigger has occurred. For example, event from Amazon S3, Amazon API Gateway, Dynamo dB, Amazon SNS, Amazon Kinesis, CloudFront, Amazon SES, CloudTrail, mobile app etc.
Step 4 − Executes AWS Lambda Code only when triggered by AWS services under the scenarios such as −
- User uploads files in S3 bucket (Entry into a S3 object)
- http get/post endpoint URL is hit (GET/POST calls to API Gateway)
- data is added/updated/deleted in dynamo dB tables
- push notification from AWS SNS
- data streams collection (Log entries in AWS Kinesis data stream)
- hosting of website
- email sending
- mobile app
- Headers modification at viewer or origin request/response in CloudFront
- Log history in CloudTrail
Step 5 − Remember that AWS charges only when the AWS lambda code executes, and not otherwise.
Advantages
- Infrastructure is already handled while you just deal with writing code
- Log Provision/Maintaing apps
- Billing based on usage (You're only charged when the code is executed and not at other times)
- Multi-language support (ie: Python, Java, C#, ...)
- Ease of code authoring/building and deploying
Disadvantages
- Not suitable for small projects
- Carefully analyze your code and decide the memory and timeout. Incase if your function needs more time than what is allocated, it will get terminated as per the timeout w/o fully executing.
- Since AWS Lambda relies completely on AWS for the infrastructure, you cannot install any additional software if your code demands it.
guide: AWS Lambda setup
Pre-requisites
- Sign up for an AWS account
- Create an administrative user (IAM identity centre user)
Steps
Create a Lambda function with a console
- Search 'Lambda' in AWS management console and click on it
- Click on 'Functions' page from side menu
- Click on 'Create function'
- Select 'Use a blueprint' / [If you want to create your own function, select 'Author from scratch']
- In 'Select blueprint' dropdown search 'Hello world function'
- Select the nodejs14.x or python3.7 version of the blueprint.
- Enter function name
- For Execution role, choose Create a new role with basic Lambda permissions.
[A new lambda function will be created where you can write-your/view code and test it]
Invoke the function
- Click on 'Test'
- For 'Test event action', choose 'Create new event'.
- For 'Event name', type a name for the test event
- For 'Event sharing settings', choose 'Private'
- For template, leave the default hello world option
- In the Event JSON, replace value1 with hello, world! Don't change key1 or the event structure.
Example:
{
"key1": "hello, world!",
"key2": "value2",
"key3": "value3"
}
- Choose Save, and then choose Test. Lambda invokes the function on your behalf. The function handler receives and then processes the sample event.
- Review the Execution result. Under Details, you should see the value that you entered in step 6: "hello, world!".
- Choose Test to invoke the function a few more times and gather additional metrics that you can view in the next step.
- Choose the Monitor tab. This page shows graphs of the metrics that Lambda sends to CloudWatch (a collection of logs, might take a few mins).
Clean up
- Delete the Lambda function
- Delete the log group
- Delete the execution role
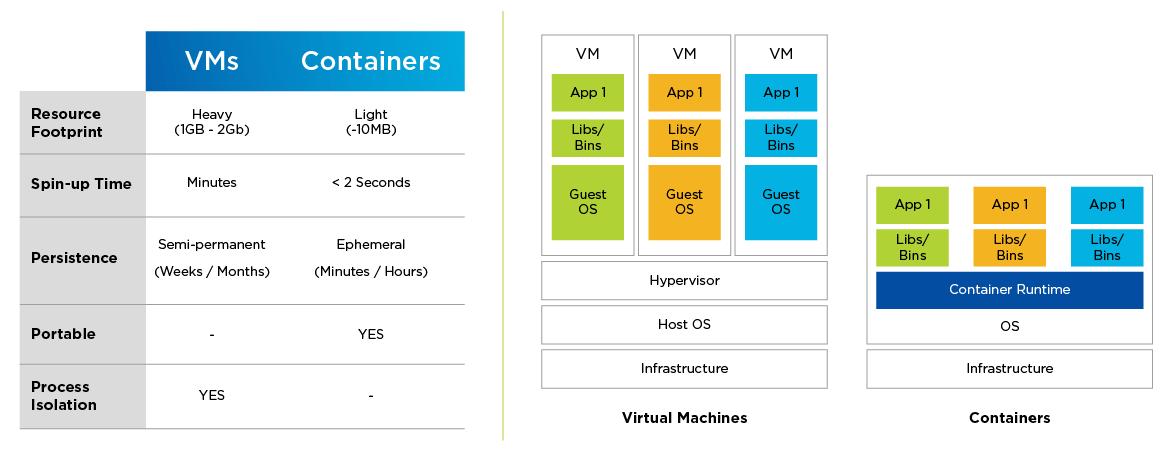
Containers let you package code in a single object. The container isolates the code and the dependencies to separate components and runs it in isolation. A container image is a lightweight, standalone, executable package of software that includes everything needed to run an application: code, runtime, system tools, system libraries and settings. The container doesn't contain OS which makes it lightweight unlike a VM which will contain a guest OS along with code, and dependencies.
* A Hypervisor is an like VMware, VirtualBox - where you can run another OS
* Container Runtime examples: Docker Engine, CRI-O
AWS ECS - Elastic Container Service
ECS helps to run containerized applications for scale and high performance. ECS supports Docker. Docker is a platform that helps you build, test, and deploy applications.
AWS EKS - Elastic Kubernetes Service
EKS helps run Kubernetes on AWS. Kubernetes is an open-source software. It helps you deploy and manage containerized applications.
AWS Cloud Fargate
Fargate manages the infrastructure as well as deploy and manage applications. It can be used along-side AWS ECS. and AWS EKS.
AWS Infrastructure
Consists of Data Center all over the world which can be used to deploy apps worldwide or to a specific location.
* Selecting a Data Center near your users will reduce the latency and make the experience of your application faster!
The network of Data Centres communicates to make sure that your applications are kept available so if any of the Data Centers fails, others will pick up the workload.
Other reasons to select a specific region:
Availability Zones - A group of Data Centres located close enough for low latency but far enough so that weather or some geographical reason doesn't bring all Data Centres down in that Availability Zone.
Edge Location is the nearest Data Center used to deliver content fast to your users. It uses a service called CloudFront which stores cached copies of your content for fast delivery.
Consists of Data Center all over the world which can be used to deploy apps worldwide or to a specific location.
* Selecting a Data Center near your users will reduce the latency and make the experience of your application faster!
The network of Data Centres communicates to make sure that your applications are kept available so if any of the Data Centers fails, others will pick up the workload.
Other reasons to select a specific region:
- Data regulations (based on the country and which info can be collected from users)
- Service availability (Some data centres have newer features & services)
- Pricing
- Customer Proximity
Availability Zones - A group of Data Centres located close enough for low latency but far enough so that weather or some geographical reason doesn't bring all Data Centres down in that Availability Zone.
Edge Location is the nearest Data Center used to deliver content fast to your users. It uses a service called CloudFront which stores cached copies of your content for fast delivery.
Utilizing AWS Resources
- With an AWS account, you can view the dashboard: AWS Management Console which is used to manage AWS services.
- AWS CLI (Command Line Interface) helps make API requests and automate action on services with scripts. - Available on Windows, MacOS, and Linux (ie can be used in cmd or terminal after installing)
- AWS SDK (Software Development Kits) like a library that can imported in source code - (supports C++, Java, .NET, and more)
AWS Elastic Beanstalk
Allows you to deploy and manage your applications in AWS cloud without worrying about the infrastructure. Elastic Beanstalk automatically handles the details of AWS EC2, Amazon S3, AWS RDS, Amazon DynamoDB, Amazon SimpleDB, capacity provisioning, load balancing, scaling, and application health monitoring. It supports applications developed in Go, Java, .NET, Node.js, PHP, Python, and Ruby. EB builds the selected supported platform version and provisions one or more AWS resources, such as Amazon EC2 instances, to run your application. Modifications can be made through EB console, AWS CLI, or eb, a high-level CLI designed specifically for Elastic Beanstalk.
To use Elastic Beanstalk, you create an application, upload an application version in the form of an application source bundle (for example, a Java .war file) to Elastic Beanstalk, and then provide some information about the application. Elastic Beanstalk automatically launches an environment and creates and configures the AWS resources needed to run your code. After your environment is launched, you can then manage your environment and deploy new application versions.
AWS CloudFormation
AWS CloudFormation is a service that helps you model and set up your AWS resources so that you can spend less time managing those resources and more time focusing on your applications that run in AWS. You create a template that describes all the AWS resources that you want (like Amazon EC2 instances or Amazon RDS DB instances), and CloudFormation takes care of provisioning and configuring those resources for you. You don't need to individually create and configure AWS resources and figure out what's dependent on what; CloudFormation handles that. The following scenarios demonstrate how CloudFormation can help.
Example
- For a scalable web application that also includes a backend database, you might use an Auto Scaling group, an Elastic Load Balancing load balancer, and an Amazon Relational Database Service database instance. You might use each individual service to provision these resources and after you create the resources, you would have to configure them to work together. All these tasks can add complexity and time before you even get your application up and running.
- -
- Instead, you can create a CloudFormation template or modify an existing one. A template describes all your resources and their properties. When you use that template to create a CloudFormation stack, CloudFormation provisions the Auto Scaling group, load balancer, and database for you. After the stack has been successfully created, your AWS resources are up and running. By using CloudFormation, you easily manage a collection of resources as a single unit.
Basics of Networking
Networking
AWS VPC (Virtual Private Cloud)
- Lets you isolate your AWS resources in your network
- This boundary around the resources allows AWS to restrict the network traffic
- Resources can be organized in subnets (chunks of IP addresses that group specific/operational-related resources in VPC)
- Lets you isolate your AWS resources in your network
- This boundary around the resources allows AWS to restrict the network traffic
- Resources can be organized in subnets (chunks of IP addresses that group specific/operational-related resources in VPC)
|
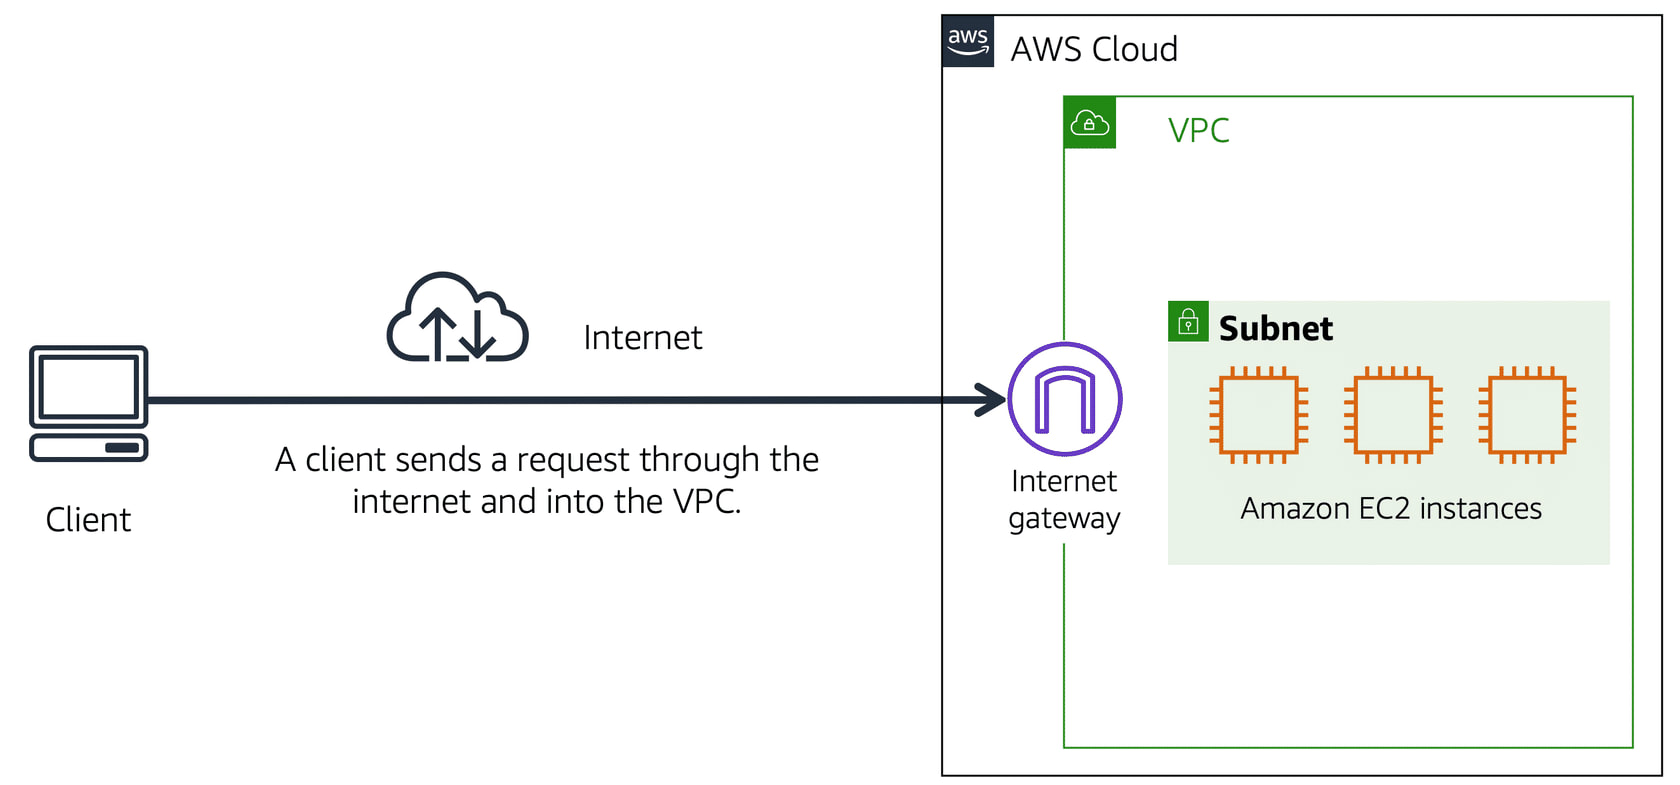
Internet Gateway
- It is a door between the VPC and the internet - Public traffic enters the VPC through the internet gateway - W/o internet gateway, resources in VPC cannot be accessed |
|
|
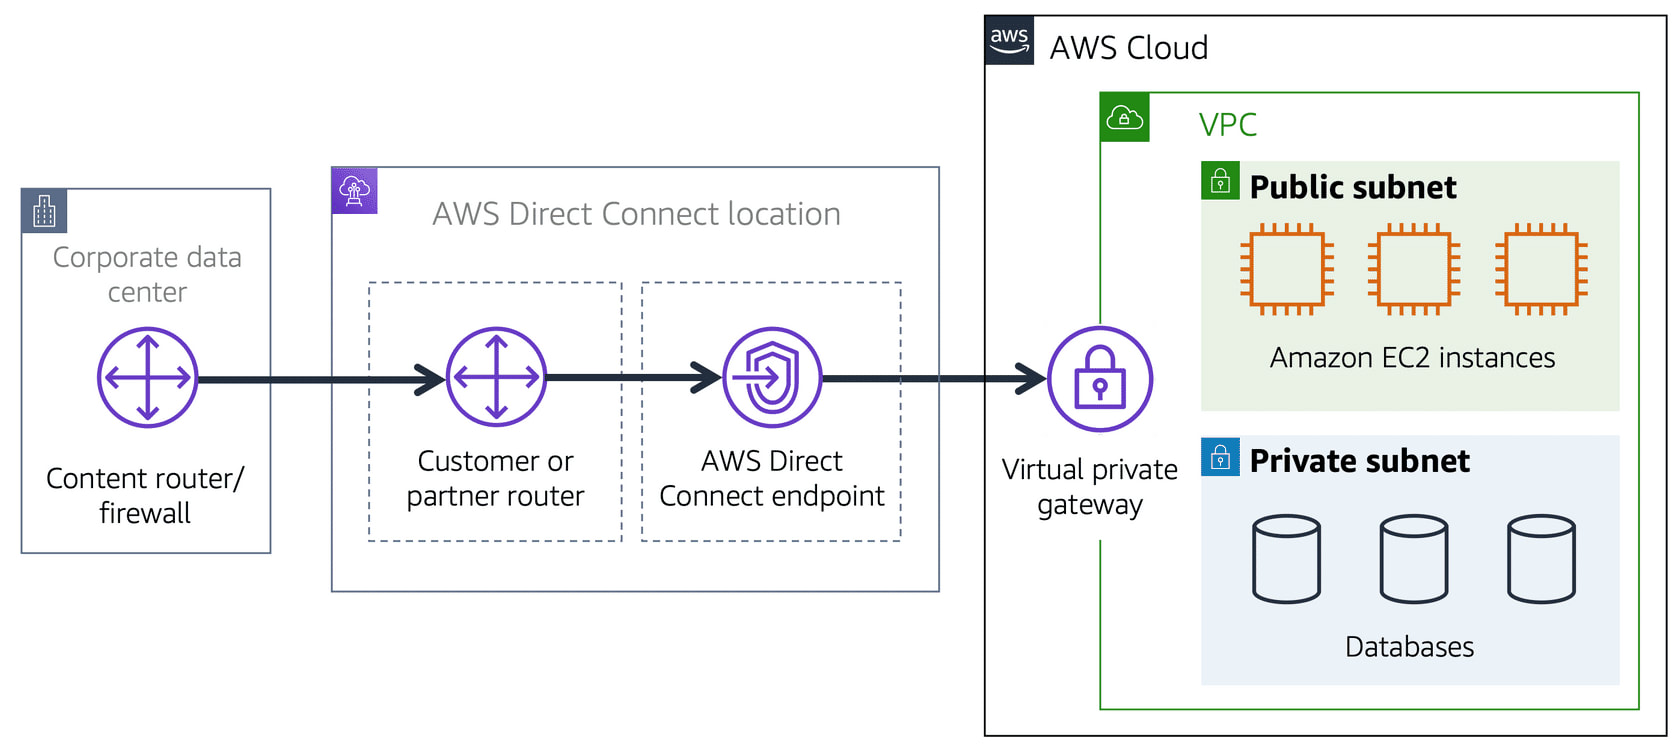
Virtual Private Gateway
- door that encloses private resources in VPC - it has extra layers of protection and encrypts the internet traffic - it allows us to develop a VPN (Virtual Private Network) so that you can only connect to the VPC through private (approved) network for secureness |

|
|
Direct Connect
- dedicated private connection between the Data Center and a VPC through a link that is not shared with others - low latency because it does not go through public traffic |
|
Public Subnet - contains resources that the public traffic can access
Private Subnet - contain resources that can only be accessed through private network like VPN
* Public and Private Subnets can communicate with each other through secure channels.
ACLs use Stateless Packet Filtering, meaning they have no memory and check each packet when entering and when exiting.
-
-
Private Subnet - contain resources that can only be accessed through private network like VPN
* Public and Private Subnets can communicate with each other through secure channels.
- When a packet enters a subnet in VPC through internet gateway, it is checked for permissions
ACLs use Stateless Packet Filtering, meaning they have no memory and check each packet when entering and when exiting.
-
- Security Group is a firewall that controls inbound and outbound traffic (packets entering and exiting subnet) and it is specific for AWS EC2 instance - the rules can be configured accordingly.
-
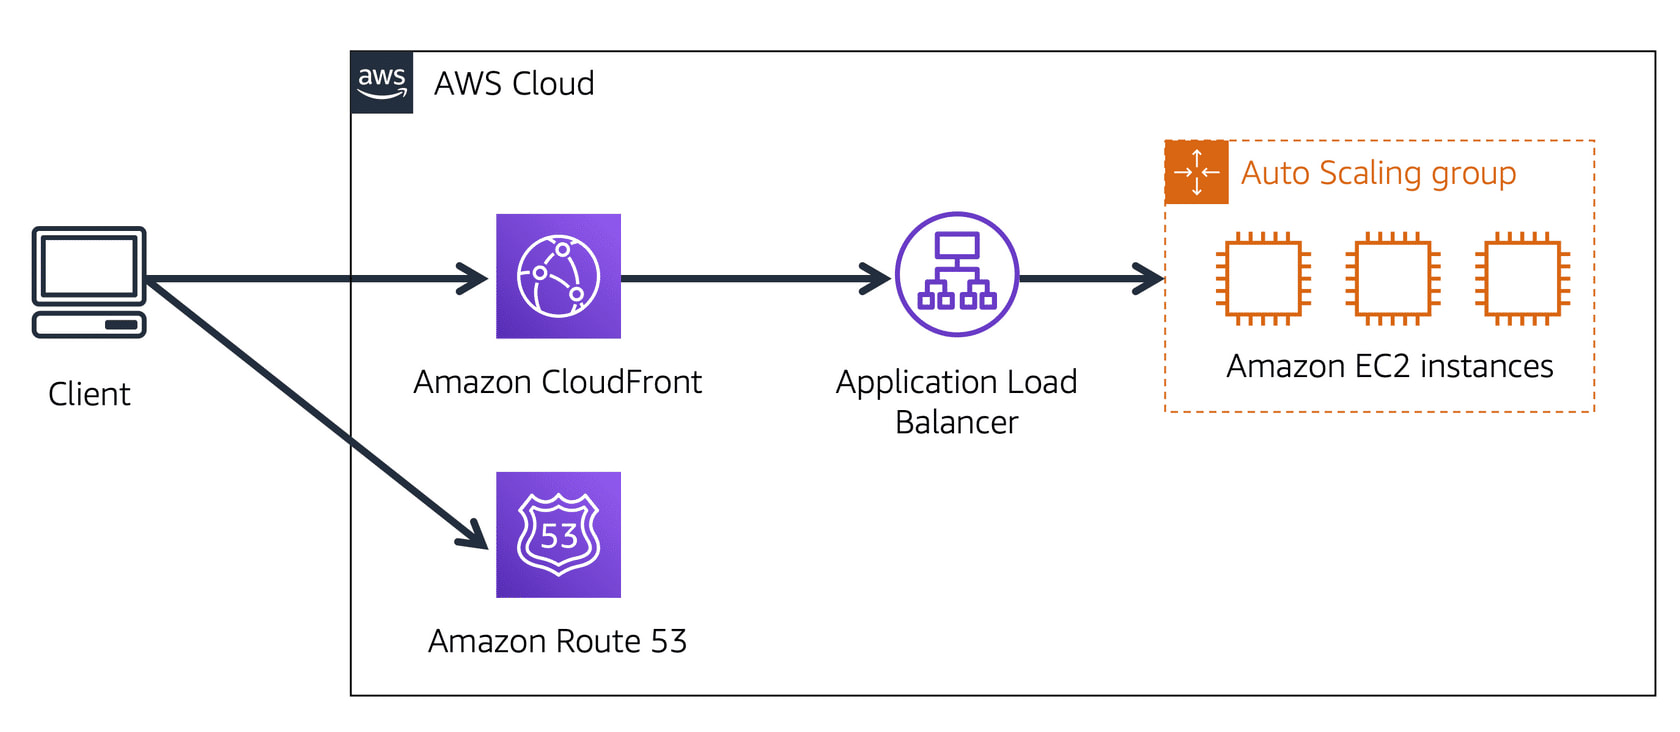
- DNS (Domain Naming System) is like a phonebook that connects the IP address to the domain name
|
* Steps on how AWS Route 53 and CloudFront is used
1. User requests data from the website application. 2. Route 53 uses DNS resolution to identify the IP address. 3. The data is sent back to the user. 4. The user request is sent to the nearest Edge Location through CloudFront. 5. CloudFront connects to the Application Load Balancer. 6. The Load Balancer sends the packet to the EC2 instance. |
|
Data Storage in AWS
Instance Stores is like a hard drive that acts as a temporary storage for AWS EC2 instances. When the instance reboots, the data will persist but if the instance hibernates or terminates, the data will be lost.
AWS EBS (Elastic Block Store)
- provides storage volumes that would have data saved even after hibernating or terminating an EC2 instance. After creating an EBS volume, you can attach it to an AWS EC2 instance.
Every next backup copies only a block of data that has changed since the last snapshot - saving on storage cost.
AWS S3 (Simple Storage Service)
- an object-level storage service; allows uploading any type of files
* EBS - data-blocks can be modified, but S3 - data-objects cannot be modified, only reuploaded
EFS (Elastic File System) - data is accessed via file paths and saves data in many Availability Zones. Ideal when the same data is accessed many times simultaneously.
RDS (Relational Database Service) - a service that automates Database tasks.
DynamoDB - a serverless non-relational, NoSQL database.
Non-relational database stores in key-value pairs.
ex: {9: {Name:Kannika, Color:Blue, Age:24}} = {id-key: object-value}
AWS Redshift - data analytics service that gather info from many sources; keeping all types of data connected. It is powered by SQL, and machine learning.
AWS EBS (Elastic Block Store)
- provides storage volumes that would have data saved even after hibernating or terminating an EC2 instance. After creating an EBS volume, you can attach it to an AWS EC2 instance.
- EBS Snapshots
Every next backup copies only a block of data that has changed since the last snapshot - saving on storage cost.
AWS S3 (Simple Storage Service)
- an object-level storage service; allows uploading any type of files
- Each object is made up of:
- - Data: any type of file
- - Metadata: info on what the data is
- - Key: unique ID
- -
- Types of AWS S3 Storage Classes:
- S3 Standard - used for data that is accessed often (expensive)
- S3 Standard-IA (Infrequent Access) - same as standard but lower storage price with high data-retrieval price
- S3 OneZone-IA - Stores data in 1 Availability Zone unlike above which stores in at least 3
- S3 Intelligent-Tiering - Automated monitoring of objects for data with unknown or frequently changing permissions; moves object to other storage classes based on how often it gets accessed
- S3 Glacier - used for archiving data
- S3 Glacier Deep Archive - same as above w/ lowest cos
* EBS - data-blocks can be modified, but S3 - data-objects cannot be modified, only reuploaded
EFS (Elastic File System) - data is accessed via file paths and saves data in many Availability Zones. Ideal when the same data is accessed many times simultaneously.
RDS (Relational Database Service) - a service that automates Database tasks.
- Relational Database - data is stored in such a way that it can be linked to other data
- Amazon Aurora - like SQL is relational database taht offers high availabilty of data; accessing large amounts of data quickly.
DynamoDB - a serverless non-relational, NoSQL database.
Non-relational database stores in key-value pairs.
ex: {9: {Name:Kannika, Color:Blue, Age:24}} = {id-key: object-value}
AWS Redshift - data analytics service that gather info from many sources; keeping all types of data connected. It is powered by SQL, and machine learning.

AWS DMS (Database Migration Service) - helps move data between databases (source database to target database)
Uses: test application against test-data to prod-data; combine databases
* Other AWS DB Services
- AWS DocumentDB - NoSQL DB that supports MongoDB
- AWS Neptune - used to create graphs from your data
- AWS QLDB (AWS Quantum Ledger Database) - provides historical changes of data
- AWS Managed Blockchain - a service that utilizes open-source frameworks to create or manage blockchain networks
- AWS ElastiCache - store parts of data in layers for fast read times
- AWS DAX (DynamoDB Accelarotor) - in-memory cache service for AWS DynamoDB w/ faster read times
BAsics of Security + AWS Security
Security
- Shared Responsibility
AWS handles infrastructure including: Data Centers, Hardware and Software, Virtualization, Networking
Customer manages AWS services, software, and access to the data.
AWS IAM (Identity and Access Management) - helps manage AWS resources and services. IAM features are:
- AWS account root user - created when you signup for an AWS account
- IAM Users - can access resources and services whose permission is set by the root user
- IAM policy - a document that defines permission given a user and a resource
- IAM groups - group of IAM resources with same permissions
- IAM roles - temporary access to service or resources
- Multi-factor authentication
AWS Organization
- a group of users with a root user that manages permissions of other accounts in the org. SCPs (Service Control Policies) allow you to restrict AWS resources and services for each account.
- Organizational Units = subgroup of accounts in an AWS Org. | easier to manage permissions
AWS Artifact
- AWS Artifact Agreements - agreement on how stored info is used
- AWS Artifact Reports - compliance report
- Customer Compliance Centre - place to learn more about AWS compliance
DoS (Denial of Service) attacks is when a flood of data overloads an application or a website.
DDoS (Distributed Denial of Service) is same as above but attack comes from different sources (ie: through bots)
AWS Shield provides protection against DoS and DDoS for all AWS users
* Other Security Services
- AWS KMS (Key Management Service) - ensures the security of your application data with cryptographic keys
- AWS WAF (Web Application Firewall) - monitors application network request and traffic
- Amazon Inspector - offers a report of all security issues, software versions & vulnerabilities
- Amazon GuardDuty - monitors network activity and detects threats for AWS resources and infrastructure
AWS CloudWatch - lets you monitor your AWS resources through a web-browser. Alarms can be set which are defined by threshold. For ex: Alert when server stops idle or services are close to becoming inactive.
CloudTrail gives a complete history of user activity [Identity, time, IP address] and API calls on your resources.
CloudTrail Insights let you detect unusual API activities on your account by automation.
TrustedAdvisor provides recommendation based on your account uses. (ie: cost optimization, performance, security)
Pricing & Support
Free-Tier Account - 3 Types - Always Free, 12 months free, trial (like a paid account for short-term)
Paid Options
AWS Pricing Calculator - can be used for cost estimates
AWS Billing Dashboard - lets you pay your AWS bill, monitor usage, and analyze costs
Consolidated Billing - many accounts => 1 bill; 1 bill for all AWS accounts in an organization; shared discounts in many accuounts; tracking cost is easier
AWS Budget - lets you plan usage, cost, and set alerts if close to surpassing
AWS Cost Explorer - tool used to create reports and analyze expenses.
AWS Cloud Support Plans - Basic (free), Developer (cheapest), Business (lower price), Enterprise (expensive)
AWS Marketplace - digital catalog where you can list and sell your software that runs on AWS
Paid Options
- Pay for What You Use
- Pay Less When You Reserve (compared to buying a server)
- Pay Less with Volume-Based Discount When You Use More (ie: buy 2 for $15 instead of 1 for $10)
AWS Pricing Calculator - can be used for cost estimates
AWS Billing Dashboard - lets you pay your AWS bill, monitor usage, and analyze costs
Consolidated Billing - many accounts => 1 bill; 1 bill for all AWS accounts in an organization; shared discounts in many accuounts; tracking cost is easier
AWS Budget - lets you plan usage, cost, and set alerts if close to surpassing
AWS Cost Explorer - tool used to create reports and analyze expenses.
AWS Cloud Support Plans - Basic (free), Developer (cheapest), Business (lower price), Enterprise (expensive)
AWS Marketplace - digital catalog where you can list and sell your software that runs on AWS
Cloud Innovation
AWS CAF (Cloud Adoption Framework) shows how to migrate applications to the cloud.
Migration Strategies - moving an application to cloud
AWS Snow Family - group of hardware device that transport data in and out of AWS
Artificial Intelligence
Sage Maker is a ML service that predicts situation, solve complex issues, and analyze data.
- Perspectives: Business, People (skills of employees required), Governance (minimize risk), Platform (adapt new cloud service), Security, Operations (meeting client expectations)
Migration Strategies - moving an application to cloud
- Rehosting - moving an app w/o making any changes to them
- Replatforming - maving an app w/ cloud optimization
- Refactoring/Rearchitecting - changing an app's foundation
- Repurchasing - moving an app from traditional to SaaS (changing business type)
- Retaining - Keeping crucial business app the same
- Retiring - removing an app
AWS Snow Family - group of hardware device that transport data in and out of AWS
- AWS Snowcone - w/ 8TB storage space, 4GB RAM, and 2 CPUs, it transfers data
- AWS Snowball
- - Snowball Edge Storage Optimized devices - great for large-scale data migrations
- - Snowball Edge Compute Optimized devices - great when there's large amounts of comuting
- - Snowball Edge Storage Optimized devices - great for large-scale data migrations
- AWS Snowmobile - tansfers up to 100 petabytes of data to AWS
Artificial Intelligence
- - Service to build voice and text chatbots - Amazon Lex
- - Service that can convert text to speech - Amazon Transcribe
- - Service that can discover text patterns - Amazon Comprehend
- - Service that can detect potential fraud activities online - Amazon Fraud Detection
Sage Maker is a ML service that predicts situation, solve complex issues, and analyze data.
AWS Well-Architectured Framework helps in:
Benefits of AWS Cloud
- - Operational excellence
- - Security
- - Reliability
- - Performance Efficiency
- - Cost Optimization
Benefits of AWS Cloud
- - Trade upfront expense for variable expense
- - Benefit from massive economies of scale
- - Stop guessing capacity
- - Increase speed and agility
- - Stop spending money running and maintaining data centers
- - Go global in minutes
Deploying a project w/ AWS Elastic beanstalk
Deploying a project with AWS Elastic Beanstalk
AWS Elastic Beanstalk can be used to deploy web applications. AWS EB also provides additional services such as: EC2s, Load Balancers, Auto Scaling with health monitoring, and Security Groups.
Step 1. Login to your AWS account, from Management console, search and click on Elastic Beanstalk. Once there, click on 'Create Application' button.
Step 2. Type your Application name. Skip Tags section, and go to Platform section. Select the language under Platform, the machine type in Platform branch (ie: Mac OS 64-bit) and select a Platform version. Under Application code, select to 'Upload your code'. and finally click on Create Application.
Step 3. We need to zip our project. Open the project folder in your desktop, and select all the files in it and zip them up. DO NOT zip the project folder itself - that won't work. Now click on 'Upload and Deploy' button in the Elastic Beanstalk environment. Select the zipped folder.
Step 4. After uploading, a black box will appear with a series of logs to launch the Elastic Beanstalk application. Once it finishes, you'll see the health status which will be red for a few moments. After the health status improves, click on the URL provided and you should be able to see your project.
Step 5 a. In the Elastic Beanstalk console, left side menu, under your launched application, click on Configuration. This will show the details of the instance that is running. On the EC2 Management Console, and the left-side bar, click on Load Balancers - this will show the Load Balancer that Elastic Beanstalk has setup for our project. Similarly, on the EC2 Management Console's left-side bar, click on 'Auto Scaling Group'. Click on the check box of your 'Auto scaling group' and go to the 'Details' tab - this will show you where you can set the desired # of servers capacity, min & max capacity. Beside 'Details' tab, there is 'Automatic Scaling' tab, 'Execute policy when' indicates when new servers will added/removed.
Step 5 b. Under the 'Monitoring' tab in the Auto Scaling Group, there will be a link that'll take you to CloudWatch - Clicking on it will take you to the CloudWatch Management Console where you can explore more services to add to your application.
Another Approach to Deploy an WebApp in EB
Step 1. Login to AWS and go to EB console and click on Create Application. Type your application name, select node.js under platform leave Sample application as the selected option under Application code and click on Create Application.
Step 2. After few minutes, your new EB application should be ready and live. You can view it by clicking on the link auto-generated at the top of the page.
Step 3. First, we need to zip our project files so that they can be uploaded all at once. Navigate to your project directory, select all the files and folders excluding node_modules, and compress them into a zip file. Navigate back to your Elastic Beanstalk console, and on the left-hand pane, select the environment you created earlier. Next, select Upload and deploy. Click on Choose file, select the zip file you just created, and click on Deploy. After a few minutes, the deploy should be complete. Now, if you click on the URL that was generated by AWS EB, you should see your deployed app.
Step 5. Go to the search bar in your AWS console, search for CodePipeline, and click on it. On the CodePipeline console, click on Create pipeline. Type a pipeline name and have the CodePipeline create a new service role for you, select New service role. A new role name will be auto-generated for you. Click on Next.
Step 6. On the Add Source page, select GitHub (Version 2) as your code source provider. If you don’t have an existing GitHub connection, click on Connect to GitHub to give AWS CodePipeline access to your GitHub account and repositories. In the new window or tab that pops up, give your connection a name (which can be anything) and click on the Connect to GitHub button.
Step 7. On the next page, AWS Connector for GitHub requests permission to verify your GitHub identity and control access to your resources. To grant permission, click on Authorize AWS Connector for GitHub. Upon authorization, you’ll be redirected back to the Create connection page. To have GitHub Apps generate a link to your GitHub to be used by CodePipeline, click on Install a new app. Now, you’ll be redirected to a page to select the GitHub account or organization to which you want to connect. Select the appropriate option.
Step 8. Next, you’ll be prompted to decide whether you want to give AWS access to all the repositories in your account or only specific ones. Click on Install and after installation, you’ll be redirected to the Create connection page. And then, click on Connect to complete the process.
Step 9. Now, back on the Add source page, you should see a Ready to connect message. If you click on the Repository name search box, you should see a list of your repositories. Select the one you want to deploy. Next, select the Branch name and click on Next. Build stage is optional, so we can skip it.
Step 10. [Add Deploy Stage] Connecting our pipeline to deployment tool. Under Deploy provider, select AWS Elastic Beanstalk as the tool through which your app will be deployed. Under Region, leave the default region in which your pipeline was created. For Application and Environment name, select the application that you created in AWS Elastic Beanstalk. Click on Next. Review and then next, your code will be deployed from the source to Elastic Beanstalk.
If you load your Elastic Beanstalk URL, you should see your newly deployed app. If you commit and push any changes to your GitHub repo, it should be reflected in your Elastic Beanstalk application.
Step 1. Login to your AWS account, from Management console, search and click on Elastic Beanstalk. Once there, click on 'Create Application' button.
Step 2. Type your Application name. Skip Tags section, and go to Platform section. Select the language under Platform, the machine type in Platform branch (ie: Mac OS 64-bit) and select a Platform version. Under Application code, select to 'Upload your code'. and finally click on Create Application.
Step 3. We need to zip our project. Open the project folder in your desktop, and select all the files in it and zip them up. DO NOT zip the project folder itself - that won't work. Now click on 'Upload and Deploy' button in the Elastic Beanstalk environment. Select the zipped folder.
Step 4. After uploading, a black box will appear with a series of logs to launch the Elastic Beanstalk application. Once it finishes, you'll see the health status which will be red for a few moments. After the health status improves, click on the URL provided and you should be able to see your project.
Step 5 a. In the Elastic Beanstalk console, left side menu, under your launched application, click on Configuration. This will show the details of the instance that is running. On the EC2 Management Console, and the left-side bar, click on Load Balancers - this will show the Load Balancer that Elastic Beanstalk has setup for our project. Similarly, on the EC2 Management Console's left-side bar, click on 'Auto Scaling Group'. Click on the check box of your 'Auto scaling group' and go to the 'Details' tab - this will show you where you can set the desired # of servers capacity, min & max capacity. Beside 'Details' tab, there is 'Automatic Scaling' tab, 'Execute policy when' indicates when new servers will added/removed.
Step 5 b. Under the 'Monitoring' tab in the Auto Scaling Group, there will be a link that'll take you to CloudWatch - Clicking on it will take you to the CloudWatch Management Console where you can explore more services to add to your application.
Another Approach to Deploy an WebApp in EB
Step 1. Login to AWS and go to EB console and click on Create Application. Type your application name, select node.js under platform leave Sample application as the selected option under Application code and click on Create Application.
Step 2. After few minutes, your new EB application should be ready and live. You can view it by clicking on the link auto-generated at the top of the page.
Step 3. First, we need to zip our project files so that they can be uploaded all at once. Navigate to your project directory, select all the files and folders excluding node_modules, and compress them into a zip file. Navigate back to your Elastic Beanstalk console, and on the left-hand pane, select the environment you created earlier. Next, select Upload and deploy. Click on Choose file, select the zip file you just created, and click on Deploy. After a few minutes, the deploy should be complete. Now, if you click on the URL that was generated by AWS EB, you should see your deployed app.
- CI/CD
Step 5. Go to the search bar in your AWS console, search for CodePipeline, and click on it. On the CodePipeline console, click on Create pipeline. Type a pipeline name and have the CodePipeline create a new service role for you, select New service role. A new role name will be auto-generated for you. Click on Next.
Step 6. On the Add Source page, select GitHub (Version 2) as your code source provider. If you don’t have an existing GitHub connection, click on Connect to GitHub to give AWS CodePipeline access to your GitHub account and repositories. In the new window or tab that pops up, give your connection a name (which can be anything) and click on the Connect to GitHub button.
Step 7. On the next page, AWS Connector for GitHub requests permission to verify your GitHub identity and control access to your resources. To grant permission, click on Authorize AWS Connector for GitHub. Upon authorization, you’ll be redirected back to the Create connection page. To have GitHub Apps generate a link to your GitHub to be used by CodePipeline, click on Install a new app. Now, you’ll be redirected to a page to select the GitHub account or organization to which you want to connect. Select the appropriate option.
Step 8. Next, you’ll be prompted to decide whether you want to give AWS access to all the repositories in your account or only specific ones. Click on Install and after installation, you’ll be redirected to the Create connection page. And then, click on Connect to complete the process.
Step 9. Now, back on the Add source page, you should see a Ready to connect message. If you click on the Repository name search box, you should see a list of your repositories. Select the one you want to deploy. Next, select the Branch name and click on Next. Build stage is optional, so we can skip it.
Step 10. [Add Deploy Stage] Connecting our pipeline to deployment tool. Under Deploy provider, select AWS Elastic Beanstalk as the tool through which your app will be deployed. Under Region, leave the default region in which your pipeline was created. For Application and Environment name, select the application that you created in AWS Elastic Beanstalk. Click on Next. Review and then next, your code will be deployed from the source to Elastic Beanstalk.
If you load your Elastic Beanstalk URL, you should see your newly deployed app. If you commit and push any changes to your GitHub repo, it should be reflected in your Elastic Beanstalk application.