Intro
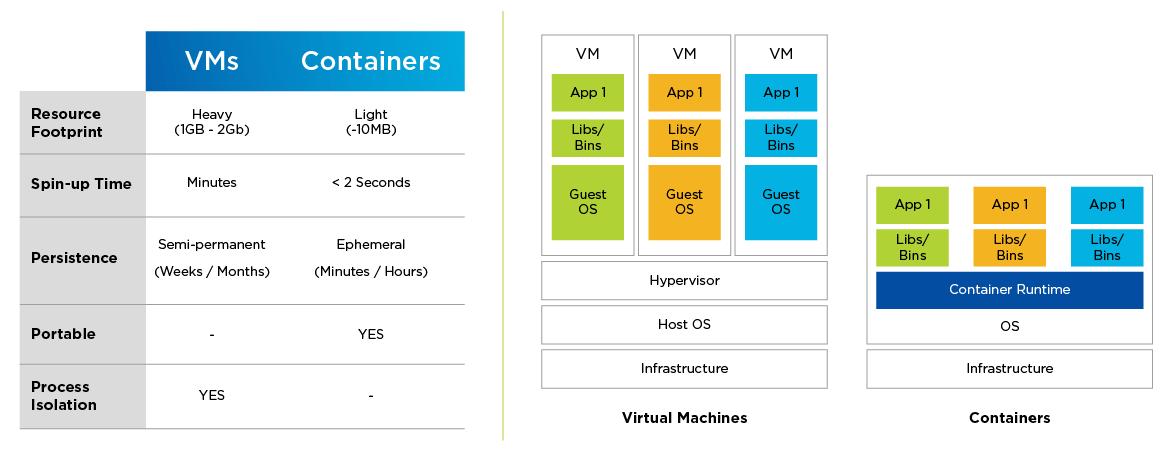
Containers let you package all your code files in a single object. The container isolates the code and the dependencies to separate components and runs it in isolation. A container image is a lightweight, standalone, executable package of software that includes everything needed to run an application: code, runtime, system tools, system libraries and settings. The container doesn't contain OS which makes it lightweight unlike a VM which will contain a guest OS along with code, and dependencies.
However, the container does contain application code, libraries & dependencies, and the runtime/environment configuration.
However, the container does contain application code, libraries & dependencies, and the runtime/environment configuration.
* Container Runtime = Docker, CRI-O | * Hypervisor = VMware, VirtualBox - where you can run another OS
o What does an Operating System consist of?
OS Application Layer <= communicates with => OS kernel <= communicates with => Hardware
o Container only virtualizes OS Application Layer while VMs virtualize OS Application Layer AND OS kernel. So Docker container contains an OS app layer for that specific app but it uses the kernel of the host.
-
o Drawback - Linux container cannot be easily run on Mac machine because the Mac runs Mac OS Kernel which does not support Linux OS app layer.
o Executing (running apps) W/O Containers developers would need to install each dependency (ie: PostgreSQL, Redis, etc.) onto their local machines but the installation process would be different for each OS making the process prone to errors.
o Deploying W/O Containers - The development team would send an artifact (like a zip file, ie: *.jar and a database file) along with an instruction files on how to setup & execute it on the server to the operations team. The operations team will handle the installing & configuring apps and its dependencies - but this process gets complicated as mentioned above when executing w/o containers.
o W/ Containers PostgreSQL, Configurations, start script is packaged together in an isolated environment. Now the service can be started using 1 docker command - this command will be the same for all OS and for any service. It also makes it a lot easier to run different versions of the same application.
=> It standardizes process of running any service on any local dev environment
o Deploying W/ Containers - The Docker artifact includes everything the app needs. So the ops team just need to run a docker command to fetch and run docker artifact
=> No configuration needed on the server (except for docker runtime)

|
Docker |
Develop, Ship, Run - The whole idea of Docker is for developers to easily develop applications, ship them into containers which can then be deployed anywhere - separating infrastructure and applications in order to deliver software quickly.
Docker - A computer software used for Virtualization allowing to run many containers (many OS) on the same infrastructure (unlike VMs because containers use fewer resources).
Docker reduces the size of development by providing a smaller footprint of the required OS via containers.
Even if your host runs Windows OS, you can have Linux images running in containers with the help of Hyper-V, which automatically creates a small VM to virtualize the system’s base image, (ie: Linux).
Docker Architecture
- Docker Engine: Docker is the client-server type of application which means we have clients who relay to the server. So the Docker daemon called: dockerd is the Docker engine which represents the server, can run on any OS
- Docker Containers: Containers are the organizational units and one of the Docker basics concept. When we build an image and start running it; we are running in a container - also making it portable
Getting Started
Download Docker App (w/ UI or through terminal) from here: https://docs.docker.com/desktop/install/mac-install/
Check to see if you have docker installed:$ docker version
Open Docker UI which will have the Docker Daemon running and then execute:
Docker Hub - a registry service (~ a website), that allows you to download Docker images that are built by other communities
Check to see if you have docker installed:$ docker version
Open Docker UI which will have the Docker Daemon running and then execute:
- :$ sudo docker run hello-world
- Usage: docker run [OPTIONS] IMAGE [COMMAND] [ARG...]
Docker Hub - a registry service (~ a website), that allows you to download Docker images that are built by other communities
- Go to https://hub.docker.com/ sign up to create an account.
- Next, search for and find the Jenkins image
- Once found, scroll down and find Docker Pull Command (used to download the Jenkins image onto the local Ubuntu server)
- Execute this to get Ubuntu OS on Windows/Mac:$ docker run –it ubuntu bash
- Run this in the Ubuntu Server:$ sudo docker pull jenkins
- To run Jenkins as a container on the Ubuntu Server, execute this:$ sudo docker run -p 8080:8080 -p 50000:50000 jenkins
Docker Images
In Docker, everything is based on images - An image is based on filesystems and parameters. It contains the source code to build the containers, which can have software pre-installed that speeds up deployment.
=> An executable artifact (ie: JS app files, node&npm+any other dependencies/runtime, and Linux OS app layer)
Docker images can be updated to new version as well (ie: Jenkins image v1.0.9, Jenkins image v1.1.3, etc) => each version of a docker image can be identified by tags. To download a specific image, go to terminal and execute
=> An executable artifact (ie: JS app files, node&npm+any other dependencies/runtime, and Linux OS app layer)
- For example in this command:$ docker run hello-world
- 'run' indicates to execute an instance of the image => container
- 'hello-world' is the image which the container is made of
- -
- This command:$ docker images lists all the images installed in the system
- :$ docker run [image_name] will download the image from Docker Hub (if not already downloaded) and runs the container
- After executing:$ sudo docker images , it will list out the imageID which can be used to remove images from system
- :$ docker rmi [imageID]
- :$ docker inspect [repository_name] will provide detailed info of the mentioned image(repository_name)
- :$ sudo docker inspect jenkins
- -
- :$ docker ps -a lists all the containers (w/o 'a' flag, lists only currently running containers)
- :$ docker history [imageID] lists all the commands that were run with that image via a container
Docker images can be updated to new version as well (ie: Jenkins image v1.0.9, Jenkins image v1.1.3, etc) => each version of a docker image can be identified by tags. To download a specific image, go to terminal and execute
- :$ docker pull [image_name]:[tag_name]
- for example :$ docker pull nginx:1.23 This command automatically pulls the image from docker hub (instead of some other registry) + If we don't mention any tags, it will download the 'latest' tag
- :$ docker images This command will show the downloaded images and their tags + 2 of same image w/ different tags can be downloaded
- :$ docker run -d nginx:1.23 runs the image with the specified tag in the background
- :$ docker ps executing this will show the running image
- :$ docker logs [ContainerID_from_above_command] will print out the output if the image had run in foreground
Docker Container Commands
Containers are the organizational units and one of the Docker basics concept. When we build an image and start running it; we are running in a container - also making it portable
=> it is basically a running instance of an image
-
=> it is basically a running instance of an image
-
- :$ docker top containerID lists the top-level processes within a container
- :$ docker start/stop containerID starts-a-stopped or stops-a-running container
- :$ docker rm containerID deletes a container
- :$ docker stats containerID provides statistics of a running container
- :$ docker pause/unpause containerID pauses/unpauses all processes on the running container
- :$ docker kill containerID kills processes in the running container
- Configuring :$ service docker start/stop starts/stops the docker daemon process
- :$ docker run --name [my-container-name] -d [image-name]
Container Port vs Host Port
Application inside container runs in an isolated Docker network. We need to expose the container port to the host (the machine the container runs on)
- Port Binding: Bind the container's port to the host's port to make the service available to the outside world
- Some images have dedicated ports: nginx always runs on port 80, redis always runs on port 6379. To bind ports, add a 'p' flag with [host_port]:[image_port]
- -
- :$ docker run -d -p 9000:80 nginx:1.23 *Note: only 1 service can run on a given host port
- Now, on your local laptop, goto http://localhost:9000/
Private Docker Registries
Docker Hub is a public registry => anyone can search and download images stored in here
But companies/organizations like to use private registries where you need to authenticate to download images of their applications. Big Clouds provider offer to create private registries: Amazon ECR, Google Container Registry and others.
But companies/organizations like to use private registries where you need to authenticate to download images of their applications. Big Clouds provider offer to create private registries: Amazon ECR, Google Container Registry and others.
- Repository: Inside a registry, you can have a repository for each application, and inside each repository you can have multiple images (for each version of the application) => collection of related images
Docker Files
We can create our own docker images with the help of Docker Files - it is a text file with instructions on how to build your image (which essentially contains instructions on how to build/run your application and when we execute this docker file it will build an image which can then be used to run a container) . Each docker image is build from a base (parent) image. For this example, we will build an image from a simple node application.
Simple node app
|
node-app > src > server.js
const express = require('express'); const app = express(); app.get('/', (req, res) => { res.send("Welcome to Kannika's awesome application!"); }); app.listen(3000, function () { console.log("app listening on port 3000"); }); |
node-app > package.json
{ "name": "my-app", "version": "1.0", "dependencies": { "express": "4.18.2" } } |
Step 1 - Create a file called 'Dockerfile' with no file extension
node-app > Dockerfile
Step 2 - Choose a base image depending on which tool you need to have available
# The below line indicates that node w/ specified tag is used as a base image to create our new image
FROM node:19-alpine
# Most images have Linux OS app layer, so this image will have Linux OS with node on top of it
# Every image has multiple image layers
Step 3 - 'COPY' application files from host into the container (ie: COPY [location_on_host] [location_on_container])
COPY package.json /app/
COPY src /app/
Step 4 - cd into the application directory for the following commands
WORKDIR /app
Step 5 - 'RUN' executes mentioned command in a shell inside the container environment
RUN npm install
Step 6 - 'CMD' last command that starts the process
CMD ["node", "server.js"]
*** Below should not be included, it's just for information ***
Environment variables can be set using 'ENV'
ENV var1=May var2=Ninth
Execute command as soon as the container is launched
ENTRYPOINT command param1
On terminal
Command structure: docker build -t [myImageName]:[tag] [locationOfDockerfile]
Show terminal output
Command structure: docker build -t [myImageName]:[tag] [locationOfDockerfile]
- :$ docker build -t my-nodeapp:1.0 .
- :$ docker images
- :$ docker run -d -p 4000:3000 my-nodeapp:1.0
- :$ docker ps
Show terminal output
- :$ docker log [containerID]
- > app listening on port 3000
Docker java example
Docker Java Example
Step 1: Create a folder for our Java app
Step 2: Create java-docker-app/Hello.java
Step 3: Create java-docker-app/Dockerfile
Step 4: Build image and run container
- :$ mkdir java-docker-app
Step 2: Create java-docker-app/Hello.java
- class Hello{
- public static void main(String[] args){
- System.out.println("This java app runs by using Docker");
- }
- }
Step 3: Create java-docker-app/Dockerfile
- FROM java:8
- COPY . /var/www/java
- WORKDIR /var/www/java
- RUN javac Hello.java
- CMD ["java", "Hello"]
Step 4: Build image and run container
- :$ cd java-docker-app
- :$ docker build -t java-app .
- :$ docker run java-app
Docker UI - Containers can easily be stopped, started, restarted, or deleted. You can view list of all containers and images. Containers can be created based on the images.
By creating a Docker Hub account, you can upload your image to make it public - This can be done through the push command where you push your image to your repo. Or if you want to make it privately available, you can create a private registry in Docker Hub and upload your image in there which will require accessors to authenticate before pulling the image.
By creating a Docker Hub account, you can upload your image to make it public - This can be done through the push command where you push your image to your repo. Or if you want to make it privately available, you can create a private registry in Docker Hub and upload your image in there which will require accessors to authenticate before pulling the image.
Docker Storage Driver
To check which storage driver, docker is currently using, execute
:$ docker info
The output will also show the 'Backing File System' which is the storage driver that is operating on top of the filesystem
:$ docker info
The output will also show the 'Backing File System' which is the storage driver that is operating on top of the filesystem
Storage Driver |
Commonly Used On |
Disable On |
Purpose |
overlay/overlay2 |
ext4fxs |
btrfsaufsoverlayzfseCryptfs |
Good memory usage for testing applications |
aufs |
ext4fxs |
btrfsaufseCryptfs |
High-write activity used for production-ready applications |
btrfs |
btrfsonly |
N/A |
Good for instances where you maintain multiple build pools |
devicemapper |
Direct-Ivm |
N/A |
In-line with linux kernel functionality, good for testing applications |
vfs |
debugging only |
N/A |
- |
zfs |
zfsonly |
N/A |
Good for systems which are of Platform-as-a-Service type work |
* "Disabled on" means some storage drivers can not run over certain backing filesystem.
Storage Drivers can be set with this command
:$ dockerd --storage-driver=devicemapper
:$ docker info
Storage Drivers can be set with this command
:$ dockerd --storage-driver=devicemapper
:$ docker info
Docker Compose
Docker Compose is a tool for running multi-container docker applications. It can start and stop many containers with a single command.
Step 1
It is usually already installed in Mac and Windows, check with:$ docker-compose version
Or with linux install using pip:$ pip install -U docker-compose
Step 2
Create docker compose file at any location on your computer with following content
docker-compose.yml
version: '3'
services:
web:
image: nginx
ports:
- 9090:80
database:
image: redis
* redis is a type of database like mongodb. The version value might need to be changed/updated
Check validity of file by command:$ docker-compose config
Step 3
Run it:$ docker-compose up -d
If you check the list of running container, you will see 2 containers running:$ docker ps
Step 4
Stop the running containers:$ docker-compose down
Extra Tip
o In docker Hub after clicking on nginx or redis, ctrl+f to go to 'compose' section, it would show you how to add them to docker-compose.yml
o You can also create 4 instances of the database or web service with scale flag
- :$ docker-compose up -d --scale database=4
- :$ docker ps
Container Linking
You must first name the containers before linking
Try this task
Go inside container2
Now we will try pinging container1 from container2
- :$ docker run -it --name container1 -d ubuntu
- :$ docker run -it --name container2 --link container1 -d ubuntu
Try this task
- :$ docker run -it --name container1 -d ubuntu
- :$ docker run -it --name container2 --link container1 -d ubuntu
Go inside container2
- :$ docker exec -ti container2_ID bash
- :$ cat /etc/hosts
Now we will try pinging container1 from container2
- :$ apt-get update
- :$ apt-get install inputils-ping
- :$ ping container1
Docker in The Big Picture of Deployment
Developer codes JS app files with MongoDB container
=> Commits the JS code files in Git
=> The Git commit triggers Jenkins which builds the docker image [CI/CD process initiates]
=> The resulting image is pushed into the company/organization's private registry repository
=> The deployment server pulls our applications image from private registry's repo and pulls MongoDB image from the public registry - Both our container and MongoDB container will talk with each other based on our Dockerfile configuration
|
|
Kubernetes = K8s |
It is a platform to manage containers especially applications with hundreds of containerized Microservices (small sub-applications). It automates deployment, scaling, and management of containerized applications.
Guaranteed Features: No downtime, and offers disaster recovery
Drawbacks: Requires a high-level of resources, cost
-
Guaranteed Features: No downtime, and offers disaster recovery
Drawbacks: Requires a high-level of resources, cost
-
- A monolithic application architecture is built as a single unit consisting of 3 parts: database, client-side, and server-side. However with the introduction of containers, companies are switching over to microservice architecture to support CI/CD.
- -
- Microservices break an application into independent, loosely-coupled, individually deployable services. Each important function of an application operates as an independent service proxy. This architecture allows for each service to scale or update without disrupting other services in the application so that applications can be continuously delivered to end users.
- -
- Artifacts: By-products created during the software development lifecycle of an application. DevOps artifacts can include container images, meeting notes, risk assessments, user guides, images, executables, and prototypes. Software artifacts are usually stored in a repository, like JFrog Artifactory , while application artifacts are stored in a GitHub repository
Kubernetes Architecture
* node = a set of (or a single) physical/virtual machine(s)
In general, Control Plane is the master node which instructs worker nodes in Data Plane.
Master node runs important K8s processes to manage the cluster.
Virtual network (encapsulates everything in cluster): allows all (master & all worker) nodes to communicate w/ e/o - creating 1 unified machine
Notes
Master node runs important K8s processes to manage the cluster.
- API server (containerized app): Entry point to Kubernetes cluster. DevOps/Developers can access it through UI Dashboard, API calls, or kubectl CLI
- Controller Manager: Monitors the functionality of each node resources (ie: sth needs to be repaired or a container died & needs to be restarted)
- Scheduler: responsible for scheduling pods (w/ containers) on different nodes based on the workload of each node and the amount of server resources that container needs. It decides on which node new pod should be scheduled.
- ETCD: a key-value storage acting as back-up. It always has the current state of Kubernetes cluster saved (including states of each node)
Virtual network (encapsulates everything in cluster): allows all (master & all worker) nodes to communicate w/ e/o - creating 1 unified machine
- Kubelet is a k8s process that runs on each worker node which make it possible for the worker nodes to talk to each other.
- Each Pod contains a set of containers.
- Each worker node has containers of different application deployed and running on it. Depending on the workload, the scheduler decides which worker node each pod (w/ containers) will run.
- The worker nodes will have a container runtime installed to run containers (ie: Docker, CIO)
- kube-proxy manages load-balancing for pods on nodes and allows connection to Pods from devices inside or outside of the cluster (for end-users).
Notes
- Worker nodes - higher workload, bigger&more resources
- Master-node/Control-plane - runs few K8s processes but much more important. In production environment, there's usually 2 master-nodes because the other is a required back-up.
Pods
Smallest executable unit in K8s and it provides a layer over container. A pod usually contains only 1 application and each pod usually doesn't contain more than 1 container but if it does, it's because they are tightly coupled
- each pod gets its own IP but pods may die and new IP will be assigned on re-creation
service: provides a DNS name and a permanent ip address (each app/micro-service will be given a service if it needs to communicate with other apps)
- lifecycle of pod and service are not connected, so even if pod dies, the service and its ip will stay the same
If you want your application to be accessible through the browser, you'll need an external service. But if your pod is running database container, then we don't want it to be accessible through the public browser => use Internal service - accessible only within the cluster
URL of an external service: http://[ip-addr]:[port]
Through the use of Ingress, it directs the request to our application (from http://my-app.com to our service URL)
Pods communicate with each other through service
Creating containers in a pod
Creating a single container pod can be done with just 1 kubectl command
Creating a multi-container pod using yaml file
kind: Pod
metadata:
name: Tomcat
spec:
containers:
- name: Tomcat
image: tomcat: 8.0
ports:
containerPort: 7500
imagePullPolicy: Always
-name: Database
Image: mongoDB
Ports:
containerPort: 7501
imagePullPolicy: Always
Executing command:
$ kubectl create –f tomcat.yml
- $ kubectl run <name of pod> --image=<name of the image from registry>
- $ kubectl run tomcat --image = tomcat:8.0
Creating a multi-container pod using yaml file
- tomcat.yml
kind: Pod
metadata:
name: Tomcat
spec:
containers:
- name: Tomcat
image: tomcat: 8.0
ports:
containerPort: 7500
imagePullPolicy: Always
-name: Database
Image: mongoDB
Ports:
containerPort: 7501
imagePullPolicy: Always
Executing command:
$ kubectl create –f tomcat.yml

ConfigMap ≈ application.properties/EnvironmentVariable
Sample scenario:
There are 2 pods to run our application: my-app container and mongodb database container. The source code for my-app (usually in the application.properties file or as part of the environmental variables) would contain the mongodb endpoint to communicate with the database. This info of the database URL is saved in the already built application, so if we change our database, then we would have to:
1) re-build the application, 2) push it to repo, 3) pull the new image to the pod, and 4) restart the entire worker node => tedious :(
Solution: Use Kubernetes components ConfigMap and Secret
Performs the external configuration of our application. (ie: storing the environment variables)
*Important note!: ConfigMap is for non-confidential data only. (so no storing db usernames & passwords)
For storing credentials, use Kubernetes' component secret: it works just like ConfigMap but used for storing secret data (Use an encryption tool to save them encrypted)
Reference secret/configmap in deployment/pod to use the stored info
Volume / Data Storage
Problem: If a pod with a database container is restarted, then the data that was stored in it will be erased.
Solution: use Kubernetes component called volume. It attaches a physical storage like a hard drive (from local or remote through cloud) to your pod.
Solution: use Kubernetes component called volume. It attaches a physical storage like a hard drive (from local or remote through cloud) to your pod.
YAMl file for volume example
- Volume example
apiVersion: v1
metadata:
name: pv0001
labels:
type: local
spec:
capacity:
storage: 10Gi
accessModes:
- ReadWriteOnce
hostPath:
path: "/tmp/data01" -- create volume under this path on the underlying infrastructure
- Create Volume
persistentvolume "pv0001" created
- Checking Volume
NAME CAPACITY ACCESSMODES STATUS CLAIM REASON AGE
pv0001 10Gi RWO Available 14s
$ kubectl describe pv pv0001
- Creating secret using a text document
password.txt
Deployment (component of Kubernetes)
Now what if my-app pod dies and end-users will not be able to access our application => every worker node has a replica which are connected to the same service so that there would be no down time if a pod dies and is waiting until a new pod is restarted. Service is also a load balancer which means it will catch the request and forward it to whichever node is least busy.
* Important Note! : DB pods cannot be replicated via Deployments because then it might create inconsistency on which DB pod is writing to the DB causing synchronization issues.
Solution: use StatefulSet (component of Kubernetes) which works like deployment and resolves the synchronization issues for DB pods. However it can get complicated to set it up, so it is more common to host DB outside of Kubernetes cluster.
Deployment component of Kubernetes is used to create a blueprint where we can specify how many replicas of the pod we would want. We don't create pods, we create deployments (instructional file on how to create a new pod)
YAML file for deployment example
Deployments are upgraded and higher version of replication controller. It has the capability to change (update, delete, rollback) the deployment midway.
apiVersion: extensions/v1beta1
kind: Deployment
metadata:
name: Tomcat-ReplicaSet
spec:
replicas: 3
template:
metadata:
lables:
app: Tomcat-ReplicaSet
tier: Backend
spec:
containers:
- name: Tomcatimage:
tomcat: 8.0
ports:
- containerPort: 7474
deployment "Deployment" created Successfully.
NAME DESIRED CURRENT UP-TO-DATE AVILABLE AGE
Deployment 3 3 3 3 20s
apiVersion: extensions/v1beta1
kind: Deployment
metadata:
name: Tomcat-ReplicaSet
spec:
replicas: 3
template:
metadata:
lables:
app: Tomcat-ReplicaSet
tier: Backend
spec:
containers:
- name: Tomcatimage:
tomcat: 8.0
ports:
- containerPort: 7474
- Create Deployment
deployment "Deployment" created Successfully.
- Fetch Deployment
NAME DESIRED CURRENT UP-TO-DATE AVILABLE AGE
Deployment 3 3 3 3 20s
- Check the Status of Deployment
- Update the Deployment
- RollBack to previous Deployment
API Server Configuration
Request to the API server is made through YAML or JSON file and sent from K8s UI dashboard, API/curl-command, or kubectl CLI. We tell K8s what is the desired state and K8s will try to get current state to match it. Each configuration file has 3 parts: metadata, specification (spec - where we indicate our desired state), status (automatically added by K8s from ETCD and will be updated continuously).
apiVersion: apps/v1 kind: Deployment metadata: name: nginx-deployment labels: . . . spec: replicas: 2 selector: . . . template: . . . |
apiVersion: v1 kind: Service metadata: name: nginx-service labels: . . . spec: selector: application: "My Application" ports: - port: 8080 targetPort: 31999 |
Store your config file with your code.
Some more yaml examples
|
An example of how an image is pulled from the docker registry in a Kubernetes' pod.
apiVersion: v1 kind: pod metadata: name: Testing_for_Image_pull -- name given to get the name of the containers it has spec: containers: - name: neo4j-server -- name given to container by us image: <Name of the Docker image> -- name of the image which we are trying to pull imagePullPolicy: Always command: ["echo", "SUCCESS"] -- executes when everything goes fine The above code can be executed with the following commands and its log can be fetched to see the output:
|
kind: Service metadata: name: Tutorial_point_service spec: selector: application: “My Application” -- Selector ClusterIP: 10.3.0.12 ports: -name: http protocol: TCP port: 80 targetPort: 31999 -name:https Protocol: TCP Port: 443 targetPort: 31998 |
- full service yaml file
kind: Service
metadata:
name: appname
labels:
k8s-app: appname
spec:
type: NodePort
ports:
- port: 8080
nodePort: 31999
name: omninginx
selector:
k8s-app: appname
component: nginx
env: env_name
Jobs
Purpose: creates pods and tracks about their success and if the specified # of pods run successfully and is completed => job is complete.
kind: Job -- tells kubectl that this yaml file is used to create a job
metadata:
name: py
spec:
template:
metadata
name: py -- giving a name for this template
spec:
containers:
- name: py -- helps to identify the pod that will be created
image: python -- the image that will be pulled to create the container
command: ["python", "SUCCESS"]
restartPocliy: Never
Execution commands to create the job and check its status:
- py.yaml
kind: Job -- tells kubectl that this yaml file is used to create a job
metadata:
name: py
spec:
template:
metadata
name: py -- giving a name for this template
spec:
containers:
- name: py -- helps to identify the pod that will be created
image: python -- the image that will be pulled to create the container
command: ["python", "SUCCESS"]
restartPocliy: Never
Execution commands to create the job and check its status:
- $ kubectl create –f py.yaml
- $ kubectl describe jobs/py
Nodes
- a working unit that can be physical, VM, or a cloud instance
- each node has all the required configuration required to run a pod (ie: proxy service, kubelet service, Docker)
Controller Manager responsible for handling multiple nodes. To manage nodes, Kubernetes creates an object of kind node which will validate that the object which is created is a valid node and after assigns a pod to it.
apiVersion: v1
kind: node
metadata:
name: < ip address of the node>
labels:
name: <lable name>
Namespace: used to divide clusters
Red Hat's OpenShift
At its core, OpenShift is a cloud-based Kubernetes container platform that's considered both containerization software and a platform-as-a-service (PaaS). It has stricter security policies - it is forbidden to run a container as root.
At its core, OpenShift is a cloud-based Kubernetes container platform that's considered both containerization software and a platform-as-a-service (PaaS). It has stricter security policies - it is forbidden to run a container as root.
Minikube
An open-source tool that provides a K8s setup with 1 node cluster where master processes and worker processes run on one 1 machine. It can be run using a minkube container from Docker and this minikube container will have docker runtime inside it to support applications pods that use docker for deployment. Minikube setup on mac
:$ brew install minikube
:$ minikube start --driver=docker
:$ minikube status
Output should be all running and configured
Deploying a Web app w/ MongoDB using Docker & Kubernetes
We will deploy a web-app pod which will connect to the mongoDB pod through internal service using (external) configuration data from config map and secret (to securely send DB url and credentials). We will also make our web-app accessible externally from the browser using external service.
4 K8s Config Files:
Referencing ConfigMap and Secret resources: These external configurations can be reference by different deployments.
Labels under metadata
Passing Config Data to WebApp Deployment - To connect WebApp to Database, webapp needs info about:
Deploying Resources in Minikube cluster
View web app in browser
4 K8s Config Files:
- 1) ConfigMap: MongoDB Endpoint
- 2) Secret: MongoDB User & Pwd
- 3) MongoDB App w/ internal service (Deployment & Service)
- 4) Our own Web-App w/ external service (Deployment & Service)
Referencing ConfigMap and Secret resources: These external configurations can be reference by different deployments.
Labels under metadata
- You can give any K8s component a label: Labels are key-value pairs that are attached to K8s resources
- Act as identifier, which should be meaningful (ex: "env" : "dev" )
- Non-unique: all pod replicas will have the same label - Each pod in a node would be given a unique name but would all have the same label
- This common label will help us connect a Deployment to all pod replicas
- Pods labels are a required field but for Deployment and but for other components we don't have to provide a label
Passing Config Data to WebApp Deployment - To connect WebApp to Database, webapp needs info about:
- MongoDB endpoint referencing from ConfigMap and where can it access the database
- DB username & pswd referencing from Secret
Deploying Resources in Minikube cluster
- Open up Docker - have Docker daemon process running
- :$ minikube start
- ConfigMap and secret must exist before Deployments
- :$ kubectl apply -f <filename.yaml>
- apply manages applications through files defining K8s resources
- :$ kubectl apply -f mongo-config.yaml
- :$ kubectl apply -f mongo-secret.yaml
- :$ kubectl apply -f mongo.yaml
- :$ kubectl apply -f webapp.yaml
- :$ kubectl get all
- Output = <list of pods>, <list of services>, <list of deployments>
- :$ kubectl get configmap
- :$ kubectl get secret
- :$ kubectl get pod
- :$ kubectl describe pod <name-of-pod-from-above-cmd>
- :$ kubectl describe service webapp-service
- View logs of container:$ kubectl logs <podName>
View web app in browser
- :$ kubectl get svc
- NodePort Service is accessible on each worker node's IP address
- get internalIP from :$ kubectl get node -o wide
- :$ minikube ip
- Now go to browser and type: <ip_addr_found_above>:30100
- !Note: Database is also connected and works